Quantcast
Channel: 天狐博客
Viewing all 115 articles
Browse latest View live

iOS音频开发为Wav文件写入Header

$
0
0

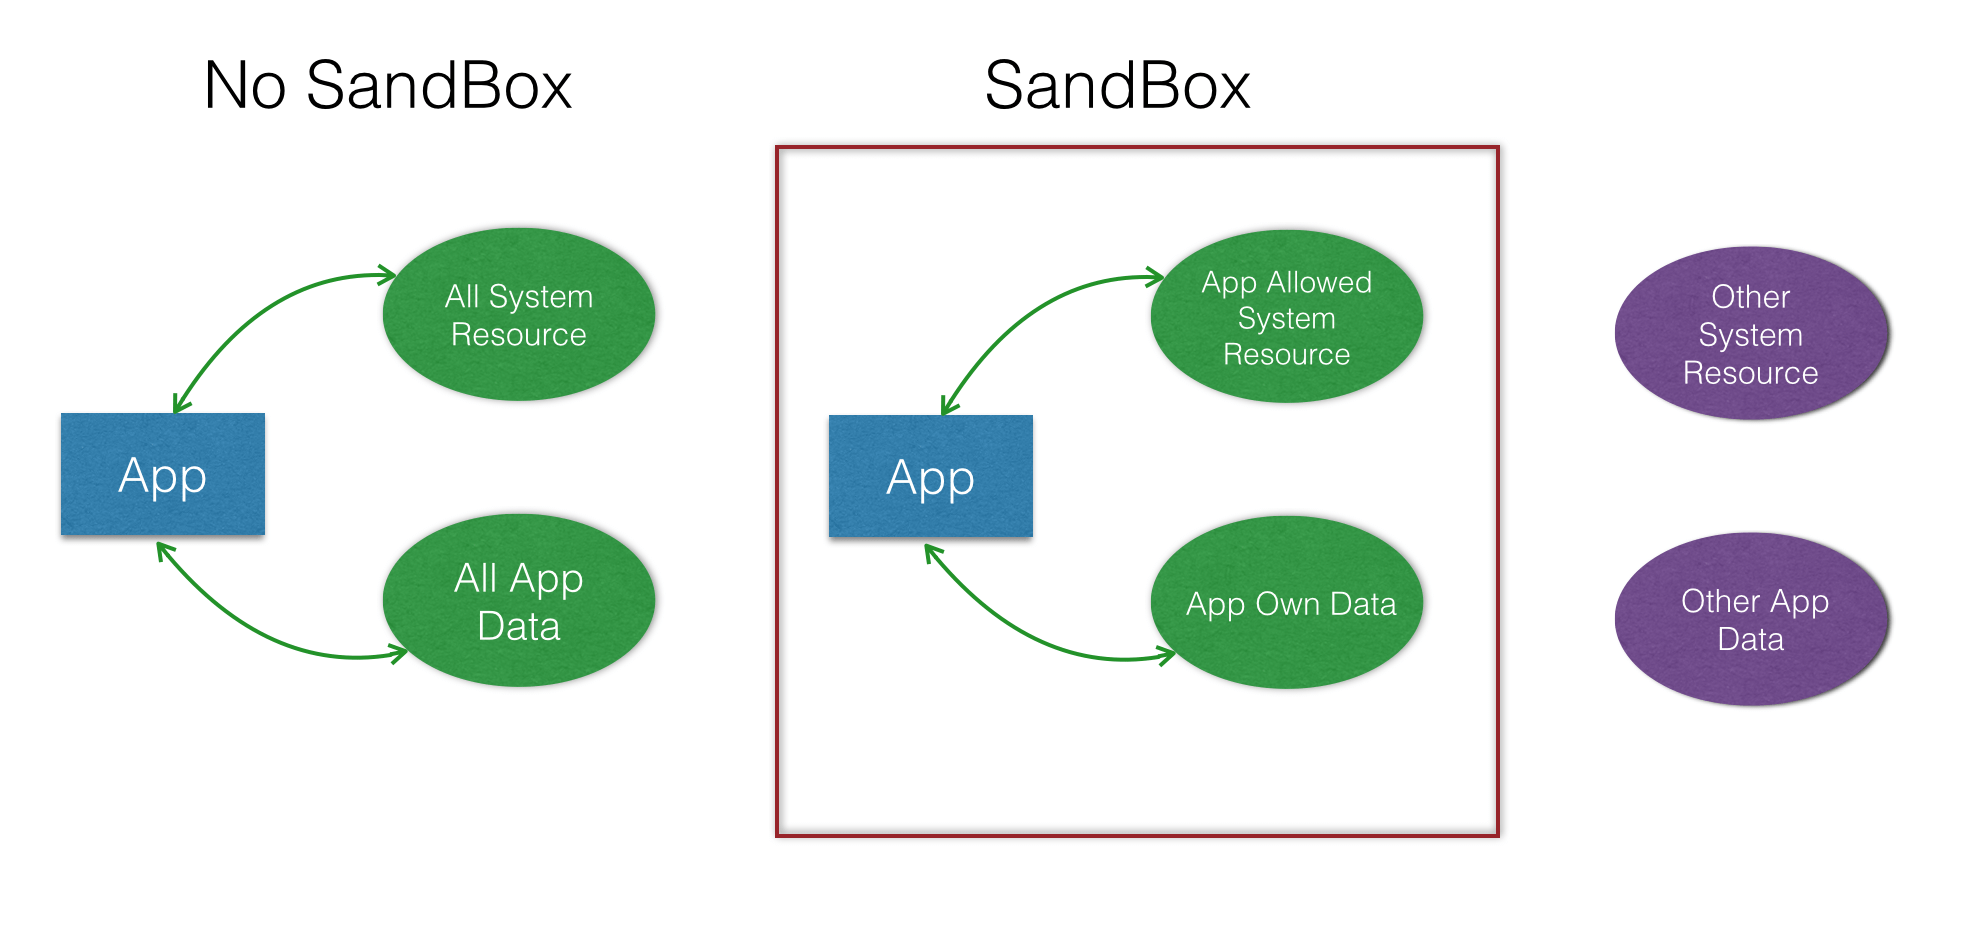
WAVE 文件作为多媒体中使用的声波文件格式之一,它是以RIFF格式为标准的。RIFF是英文Resource Interchange File Format的缩写,每个WAVE文件的头四个字节便是"RIFF"。WAVE文件由文件头和数据体两大部分组成。其中文件头又分为RIFF/WAV文件 标识段和声音数据格式说明段两部分。

NSData* WriteWavFileHeader(long totalAudioLen, long totalDataLen, long longSampleRate,int channels, long byteRate)
{
    Byte  header[44];
    header[0] = 'R';  // RIFF/WAVE header
    header[1] = 'I';
    header[2] = 'F';
    header[3] = 'F';
    header[4] = (Byte) (totalDataLen & 0xff);  //file-size (equals file-size - 8)
    header[5] = (Byte) ((totalDataLen >> 8) & 0xff);
    header[6] = (Byte) ((totalDataLen >> 16) & 0xff);
    header[7] = (Byte) ((totalDataLen >> 24) & 0xff);
    header[8] = 'W';  // Mark it as type "WAVE"
    header[9] = 'A';
    header[10] = 'V';
    header[11] = 'E';
    header[12] = 'f';  // Mark the format section 'fmt ' chunk
    header[13] = 'm';
    header[14] = 't';
    header[15] = ' ';
    header[16] = 16;   // 4 bytes: size of 'fmt ' chunk, Length of format data.  Always 16
    header[17] = 0;
    header[18] = 0;
    header[19] = 0;
    header[20] = 1;  // format = 1 ,Wave type PCM
    header[21] = 0;
    header[22] = (Byte) channels;  // channels
    header[23] = 0;
    header[24] = (Byte) (longSampleRate & 0xff);
    header[25] = (Byte) ((longSampleRate >> 8) & 0xff);
    header[26] = (Byte) ((longSampleRate >> 16) & 0xff);
    header[27] = (Byte) ((longSampleRate >> 24) & 0xff);
    header[28] = (Byte) (byteRate & 0xff);
    header[29] = (Byte) ((byteRate >> 8) & 0xff);
    header[30] = (Byte) ((byteRate >> 16) & 0xff);
    header[31] = (Byte) ((byteRate >> 24) & 0xff);
    header[32] = (Byte) (2 * 16 / 8); // block align
    header[33] = 0;
    header[34] = 16; // bits per sample
    header[35] = 0;
    header[36] = 'd'; //"data" marker
    header[37] = 'a';
    header[38] = 't';
    header[39] = 'a';
    header[40] = (Byte) (totalAudioLen & 0xff);  //data-size (equals file-size - 44).
    header[41] = (Byte) ((totalAudioLen >> 8) & 0xff);
    header[42] = (Byte) ((totalAudioLen >> 16) & 0xff);
    header[43] = (Byte) ((totalAudioLen >> 24) & 0xff);
    return [[NSData alloc] initWithBytes:header length:44];;
}

使用

NSData *header = WriteWavFileHeader(600,6000,16000,1,1);
NSMutableData *wavDatas = [[NSMutableData alloc]init];
[wavDatas appendData:header];
[wavDatas appendData:audioData];


Abstract:
This tutorial covers the creation of a WAV (RIFF) audio file. It covers bit size, sample rate, channels, data, headers and finalizing the file. This document is designed to cover uncompressed PCM audio files, the most common type of RIFF files. This document does not cover inserting useful data into the WAV (RIFF) audio file.

What's a WAV (RIFF) File?
A WAV (RIFF) file is a multi-format file that contains a header and data. For the purposes of this document, only a simple PCM file will be explored. A WAV file contains a header and the raw data, in time format.

What's bit size?
Bit size determines how much information can be stored in a file. For most of today's purposes, bit size should be 16 bit. 8 bit files are smaller (1/2 the size), but have less resolution.

Bit size deals with amplitude. In 8 bit recordings, a total of 256 (0 to 255) amplitude levels are available. In 16 bit, a total of 65,536 (-32768 to 32767) amplitude levels are available. The greater the resolution of the file is, the greater the realistic dynamic range of the file. CD-Audio uses 16 bit samples.

What is Sample Rate?
Sample rate is the number of samples per second. CD-Audio has a sample rate of 44,100. This means that 1 second of audio has 44,100 samples. DAT tapes have a sample rate of 48,000.

When looking at frequency response, the highest frequency can be considered to be 1/2 of the sample rate.

What are Channels?
Channels are the number of separate recording elements in the data. For a real quick example, one channel is mono and two channels are stereo. In this document, both single and dual channel recordings will be discussed.

What is the data?
The data is the individual samples. An individual sample is the bit size times the number of channels. For example, a monaural (single channel), eight bit recording has an individual sample size of 8 bits. A monaural sixteen-bit recording has an individual sample size of 16 bits. A stereo sixteen-bit recording has an individual sample size of 32 bits.

Samples are placed end-to-end to form the data. So, for example, if you have four samples (s1, s2, s3, s4) then the data would look like: s1s2s3s4.

What is the header?
The header is the beginning of a WAV (RIFF) file. The header is used to provide specifications on the file type, sample rate, sample size and bit size of the file, as well as its overall length.

The header of a WAV (RIFF) file is 44 bytes long and has the following format:

Positions Sample Value Description
1 - 4 "RIFF" Marks the file as a riff file. Characters are each 1 byte long.
5 - 8 File size (integer) Size of the overall file - 8 bytes, in bytes (32-bit integer). Typically, you'd fill this in after creation.
9 -12 "WAVE" File Type Header. For our purposes, it always equals "WAVE".
13-16 "fmt " Format chunk marker. Includes trailing null
17-20 16 Length of format data as listed above
21-22 1 Type of format (1 is PCM) - 2 byte integer
23-24 2 Number of Channels - 2 byte integer
25-28 44100 Sample Rate - 32 byte integer. Common values are 44100 (CD), 48000 (DAT). Sample Rate = Number of Samples per second, or Hertz.
29-32 176400 (Sample Rate * BitsPerSample * Channels) / 8.
33-34 4 (BitsPerSample * Channels) / 8.1 - 8 bit mono2 - 8 bit stereo/16 bit mono4 - 16 bit stereo
35-36 16 Bits per sample
37-40 "data" "data" chunk header. Marks the beginning of the data section.
41-44 File size (data) Size of the data section.
Sample values are given above for a 16-bit stereo source.

So, that's the header. It shouldn't be difficult to write an application that creates the header, but in case you don't want to bother, I've included some Visual Basic code to do just that at the end of this document.

Finalizing the file
Finalizing the file is actually incredibly easy. You don't need to do anything except making sure that the file size fields are filled in correctly.

Putting it together.
For the first WAV file example, we're going to create the simplest possible file. This file will be full of zero-bit data. Zero-bit data is basically a sample with 0 amplitude. While very boring, zero-bit files are important in testing stereos. Because there is an amplitude (volume) of zero, noise induced by various components can be found.

Here's visual basic code to create the file. This code is as simple as possible, and is designed to provide a look at the process.

public Sub WriteZeroByteFile()
Dim sampleRate as Integer
Dim bitSize as Integer
Dim numChannels as Integer
Dim numSeconds as Integer
Dim fileName as String
Dim fileSize as Integer
Dim dataPos as Integer
Dim headerLength as Integer
Dim totalSamples as Integer

' Set up our parameters
sampleRate = 44100        ' CD-Quality Sound.
bitSize = 16              ' Bit Size is 16 (CD-Quality).
numChannels = 2           ' Stereo mode (2-channel).
numSeconds = 1            ' We're going to make a 1 second sample.
fileSize = 0              ' Just set it to zero for now.
fileName = "c:\temp.wav"  ' Pick a temporary file name.

     
' Open the file.  This will fail if the file exists.
Open fileName For Binary Access Write As #1

' Write the header
Put #1, 1,  "RIFF"        ' RIFF marker
Put #1, 5,  CInt(0)       ' file-size (equals file-size - 8)
Put #1, 9,  "WAVE"        ' Mark it as type "WAVE"
Put #1, 13, "fmt "        ' Mark the format section.
Put #1, 17, CLng(16)      ' Length of format data.  Always 16
Put #1, 21, CInt(1)       ' Wave type PCM
Put #1, 23, CInt(2)       ' 2 channels
Put #1, 25, CLng(44100)   ' 44.1 kHz Sample Rate (CD-Quality)
Put #1, 29, CLng(88200)   ' (Sample Rate * Bit Size * Channels) / 8
Put #1, 33, CInt(2)       ' (Bit Size * Channels) / 8
Put #1, 35, CInt(16)      ' Bits per sample (=Bit Size * Samples)
Put #1, 37, "data"        ' "data" marker
Put #1, 41, CInt(0)       ' data-size (equals file-size - 44).

' headerLength is the length of the header.  It is used for offsetting
' the data position.
headerLength = 44

' Determine the total number of samples 
totalSamples = sampleRate * numSeconds

' Populate with 0 bit data.
' This isn't a good reference for creating PCM data.  Since we are
' just dumping 0 bit data, we're dumping it in 32 bit chunks.
For dataPos = 1 to (totalSamples * 4) step 4
  ' We're doing 16-bit, so we need to write 2 bytes per channel.
  ' Write both channels using a 32 bit integer.
  ' Again, this isn't a good reference.  Ignore this data writing
  ' process.  It's useless for anything but 0 bit data.
  Put #1, dataPos + headerLength, CInt(0)  
Next

' Finalize the file.  Write the file size to the header.
fileSize = LOF(1)               ' Get the actual file size.
Put #1, 5, CLng(fileSize - 8)   ' Set first file size marker.
Put #1, 41, CLng(fileSize - 44) ' Set data size marker.
Close #1 ' Close the file.
End Sub


http://www.topherlee.com/software/pcm-tut-wavformat.html


转载请注明:天狐博客 » iOS音频开发为Wav文件写入Header


Cocoa开发之NSOutlineView/NSTableView自动调整所有列宽

$
0
0

在做macOS app开发的时候,常常使用NSOutlineView/NSTableView来展示数据,有很多列时,当拖拽窗口需要实现所有列的宽同时在默认设置的宽的基础上等比扩大或缩小。

//当拖拽窗口大小,NSOutlineView frame自动更改时,Column宽等比增减
    [self.treeView setColumnAutoresizingStyle:NSTableViewUniformColumnAutoresizingStyle];
    //最后一行自动宽等比增减
//    [self.treeView sizeLastColumnToFit];
    //app第一次运行Column 自动宽等比增减,否则会有滚动条
    [self.treeView sizeToFit];

typedef NS_ENUM(NSUInteger, NSTableViewColumnAutoresizingStyle) {
    /* Turn off column autoresizing
     */
    NSTableViewNoColumnAutoresizing = 0,
    
    /* Autoresize all columns by distributing equal shares of space simultaeously
     */
    NSTableViewUniformColumnAutoresizingStyle,
    
    /* Autoresize each table column one at a time.  Proceed to the next column when
     the current column can no longer be autoresized (when it reaches maximum/minimum size).
     */
    NSTableViewSequentialColumnAutoresizingStyle,        // Start with the last autoresizable column, proceed to the first.
    NSTableViewReverseSequentialColumnAutoresizingStyle, // Start with the first autoresizable column, proceed to the last.
    
    /* Autoresize only one table column one at a time.  When that table column can no longer be
     resized, stop autoresizing.  Normally you should use one of the Sequential autoresizing
     modes instead.
     */
    NSTableViewLastColumnOnlyAutoresizingStyle,
    NSTableViewFirstColumnOnlyAutoresizingStyle
};


转载请注明:天狐博客 » Cocoa开发之NSOutlineView/NSTableView自动调整所有列宽

Cocoa开发之沙盒机制及访问Sandbox之外的文件

$
0
0

iOS默认并且只能读写对应的沙盒目录。

OSX自从10.6系统开始引入沙盒机制,规定发布到Mac AppStore的应用,必须遵守沙盒约定。沙盒对应用访问的系统资源,硬件外设,文件,网络,XPC,都做了严格的限制,这样能防止恶意的App通过系统漏洞,攻击系统,获取控制权限,保证了OSX系统的安全。沙盒相当于给每个App一个独立的空间。要获取自己空间之外的资源必须获得授权。

macOS APP不需要上架的时候,可以不开启Sandbox 功能,可以随意访问mac上的文件。

当未开启Sandbox功能上传到APPStore的时候提示:

iTunes Store operation failed.
App sandbox not enabled. The following executables must include the "com.apple.security.app-sandbox" entitlement with a Boolean value of true in the entitlements property list: [( "org.skyfox.ProfilesTool.pkg/Payload/ProfilesTool.app/Contents/MacOS/ProfilesTool" )] Refer to App Sandbox page at https://developer.apple.com/devcenter/mac/app-sandbox/ for more information on sandboxing your app.

开启Sandbox

App Sandbox

在Xcode工程target设置Tab的Capabilities中选择 App Sandbox 为ON即可开启使用沙盒,Xcode自动生成.entitlements权限配置文件到工程。并且可以配置相应的权限,(网络,硬件,App Data,文件访问)

Network:网络访问控制

Incoming Connections(Server) :应用做为Server对外提供HTTP,FTP等服务时需要打开
Outgoing Connections(Client):做为客户端,访问服务器时需要打开

Hardware:硬件资源控, Printing为必须勾选。App的默认第一个顶级菜单中有打印功能的子菜单。

Camera
Micophone
USB
Printing

App Data:获取系统的联系人,位置,日历服务时需要打开

Contacts
Location
Calendar

File Access:文件和用户目录的访问控制,分为禁止none,只读,读写3类

User Selected File:文档类应用或者需要用户选择打开某个文件时,需要选择合适的访问权限.
Downloads Folder
Pictures Folder
Music Folder
Movies Folder

如果应用中不需要的权限项,一律不要打开。否则App Review团队会拒绝你的应用上架

entitlements权限配置信息存储

沙盒中每个需要访问权限的项都对应一个key,对应的value,YES 或 NO表示是否允许访问。选择配置了沙盒的访问控制信息后,Xcode会自动保存到一个扩展名为.entitlements的plist文件中

应用打包时会对这个文件进行签名, 应用运行期间要获取某个权限时,系统都会通过.entitlements去检查应用是否有授权,如果没有就拒绝访问。

Sandbox之外的文件怎么访问?

那么问题就出现了,开启Sandbox 功能之后,NSHomeDirectory对应的文件夹形如:

/Users/yourName/Library/Containers/com.xxxx.appname/Data

程序数据文件的存储路径也不同,原来在

~/Library/Application Support/<app_name>/

如今在沙盒内:

~Library/Containers/<bundle_id>/Data/Library/Application/Support/<app_name>/

沙盒保证了程序只能访问沙盒container下的文件夹,这样就相对安全的保护了程序自身。

访问沙盒外部文件

对于用户想打开的磁盘其他位置的文件文件夹,可以有如下方式:

一、让用户人为选择目录

Capabilities中选择 App Sandbox ,在File Access中User Selected File项中选择Read/Write文件读写权限

沙盒有个默认的规则。在App运行期间通过NSOpenPanel用户手动打开的任意位置的文件,把这个这个路径保存下来,后面都是可以直接用这个路径继续访问获取文件内容的。

但是App重新启动后,这个文件路径就不能直接访问了。要想永久的获得应用的Container目录之外的文件,这里必须讲一下Security-Scoped Bookmark。

Security-scoped bookmarks:

使用bookmarks之前同样要在.entitlements文件中填写对应的key与value

Security-scoped bookmarks有2种:

An app-scoped bookmark

能为已沙盒程序提供对用户指定文件和文件夹的持久访问权。 例如,如果程序采用了一个程序容器外的下载或处理目标文件夹,通过 NSOpenpanel 对话框获得用户想使用该文件夹的初始访问权。
然后,为其创建一个 app-scoped bookmark,将它作为程序的配置储存(可能用属性列 表文件或 NSUserDefaults 类)。有了 app-scoped bookmark,程序就能获得对该文件夹的 未来访问权了。
。这种bookmark方式使用的比较多。

在.entitlements文件对应的key对应的权限key为com.apple.security.files.bookmarks.app-scope 

A document-scoped bookmark

提供了对特定文档的持久访问权。可以理解为针对文档嵌套的一种权限模式。比如你开发一个能编辑ppt文档的应用,里面嵌入了视频文件,图片文件连接。那么下次打开这个ppt文档时就能直接访问这些文件而不需要在通过NSOpenPanel打开获得授权。

Document-scoped bookmark 只能指向文件而不是文件夹。并且这个文件必须不在系统使用的 位置上(如/private 或/Library)

在.entitlements文件对应的key对应的权限key为com.apple.security.files.bookmarks.document-scope

保存打开的文件URL的bookmark

获取到URL的bookmarkData存储到NSUserDefaults等位置
NSData *bookmarkData =[url bookmarkDataWithOptions:NSURLBookmarkCreationWithSecurityScope includingResourceValuesForKeys:nil relativeToURL:nil error:NULL];

应用启动时通过URL的bookmark获取文件授权

通过bookmark数据解析获取授权的NSURL,并且执行startAccessingSecurityScopedResource方法得到访问权限。

执行block回调完成相关内容读取后,执行stopAccessingSecurityScopedResource停止授权。

NSURL *allowedUrl = [NSURL URLByResolvingBookmarkData:bookmarkData options:NSURLBookmarkResolutionWithSecurityScope|NSURLBookmarkResolutionWithoutUI relativeToURL:nil bookmarkDataIsStale:&bookmarkDataIsStale error:NULL];
@try {
  [allowedUrl startAccessingSecurityScopedResource];
  block();
} @finally {
  [allowedUrl stopAccessingSecurityScopedResource];
}

二、文件访问临时例外

在开启沙盒功能的AppApp仅可以访问container中的数据,application groupcontainerPOSIX可读的公开位置、用户手动Open或Save dialog打开的位置 如果应用程序需要永久访问其他位置可以通过启用本人所述临时例外entitlement权限额外位置带入沙盒
每个启用访问路径路径指定相应entitlement权限key值数组每个字符串必须斜杠 (/) 字符开头 — — 代表绝对路径相对于用户的目录路径如果提供的是一个目录路径必须斜杠字符串结束

home-relative-path

临时例外, 提供一个相对于user home目录的路径。相对于~

例如我指定“/Library/MobileDevice/Provisioning Profiles/”目录用来读取系统的profies文件。

当我设置home相对路径后,在程序中要手动拼接上home目录。

拼接home路径有两种方式:

一种是getpwuid方法

#include <unistd.h>
#include <sys/types.h>
#include <pwd.h>
#include <assert.h>

struct passwd *pw = getpwuid(getuid());
NSString *home =  [NSString stringWithUTF8String:pw->pw_dir];

一种是根据沙盒目录字符串截取

NSString *home = NSHomeDirectory();
    NSArray *pathArray = [home componentsSeparatedByString:@"/"];
    NSString *absolutePath;
    if ([pathArray count] > 2) {
        absolutePath = [NSString stringWithFormat:@"/%@/%@", [pathArray objectAtIndex:1], [pathArray objectAtIndex:2]];
    }

absolute-path

临时例外, 提供一个绝对路径。相对于 /

Entitlement key Capability
com.apple.security.temporary-exception.files.home-relative-path.read-only  开启对于home指定子目录或者文件的只读权限

com.apple.security.temporary-exception.files.home-relative-path.read-write

开启对于home指定子目录或者文件的读写权限

com.apple.security.temporary-exception.files.absolute-path.read-only

开启对于 / 指定子目录或者文件的只读权限

com.apple.security.temporary-exception.files.absolute-path.read-write

开启对于 / 指定子目录或者文件的读写权限


点击下载AppSandboxInDepth中文版 “App_Sandbox_In_Depth-CN

EnablingAppSandbox https://developer.apple.com/library/content/documentation/Miscellaneous/Reference/EntitlementKeyReference/Chapters/EnablingAppSandbox.html

AppSandboxTemporaryExceptionEntitlements https://developer.apple.com/library/content/documentation/Miscellaneous/Reference/EntitlementKeyReference/Chapters/AppSandboxTemporaryExceptionEntitlements.html#//apple_ref/doc/uid/TP40011195-CH5-SW4

AppSandboxInDepth https://developer.apple.com/library/content/documentation/Security/Conceptual/AppSandboxDesignGuide/AppSandboxInDepth/AppSandboxInDepth.html#//apple_ref/doc/uid/TP40011183-CH3-SW1

http://blog.csdn.net/huang_123_456/article/details/50602662

转载请注明:天狐博客 » Cocoa开发之沙盒机制及访问Sandbox之外的文件

Cocoa开发之APP开机自启动

$
0
0

macOS app 开机自启动虽然有很多种方法,但是在需要上架APPStore的情况下,访问沙盒外的文件会被拒绝.

苹果官方提供了两种方式: Service Management framework 和 shared file list

There are two ways to add a login item: using the Service Management framework, and using a shared file list

Login items installed using the Service Management framework are not visible in System Preferences and can only be removed by the application that installed them.

Login items installed using a shared file list are visible in System Preferences; users have direct control over them. If you use this API, your login item can be disabled by the user, so any other application that communicates with it it should have reasonable fallback behavior in case the login item is disabled.

Service Management framework

Service Management framework 在系统的登录项中是不可见的。只有卸载App才能移除登录项

1.这里认为你已经有了一个将要被启动的主工程与主Target

我的app名为iSimulator, ServiceManagement.framework

2.在主工程添加自动启动Target

命名最好是主Target名+Helper    比如iSimulatorHelper

3.配置XXXHelper


  • 删除XXXHelper中的windows与Menu,让它没有可展示的Window。
  • 设置XXXHelper的Info中Application is background only为YES
  • 设置XXXHelper中Build Setting下skip install为YES

4.在主APP Target中添加CopyFile到Contents/Library/LoginItems

随后点击+ 把helper app添加进来.

在主APP Target中设置Build Setting 下Strip Debug Symbols During Copy为NO, 这个是默认的为No

分别开启主APP Target和Helper的App Sandbox

代码

主APP Target的自启动开关实践中

- (IBAction)switchChanged:(ITSwitch *)itSwitch {
    NSLog(@"Switch (%@) is %@", itSwitch, itSwitch.checked ? @"checked" : @"unchecked");
    if(itSwitch.checked)
    {
        [self daemon:YES];
    }
    else
    {
        [self daemon:NO];
    }
}

-(void)daemon:(Boolean)install{
   
    NSString *helperPath = [[[NSBundle mainBundle] bundlePath] stringByAppendingPathComponent:@"Contents/Library/LoginItems/iSimulatorHelper.app"];
    if (![[NSFileManager defaultManager] fileExistsAtPath:helperPath])
    {
        return;
    }
    NSURL *helperUrl = [NSURL fileURLWithPath:helperPath];
    // Registering helper app
    if (LSRegisterURL((__bridge CFURLRef)helperUrl, true) != noErr)
    {
        NSLog(@"LSRegisterURL failed!");
    }
    // Setting login
    // com.xxx.xxx为Helper的BundleID,ture/false设置开启还是关闭
    if (!SMLoginItemSetEnabled((CFStringRef)@"org.skyfox.iSimulatorHelper",install))
    {
        NSLog(@"SMLoginItemSetEnabled failed!");
    }
    
    NSString *mainAPP = [NSBundle mainBundle].bundleIdentifier?:@"org.skyfox.iSimulator";
    BOOL alreadRunning = NO;
    NSArray *runnings = [NSWorkspace sharedWorkspace].runningApplications;
    for (NSRunningApplication *app in runnings) {
        if ([app.bundleIdentifier isEqualToString:mainAPP]) {
            alreadRunning = YES;
            break;
        }
    }
    
    if (alreadRunning) {
        [[NSDistributedNotificationCenter defaultCenter]postNotificationName:@"killme" object:[NSBundle mainBundle].bundleIdentifier];
    }
}

Helper的AppDelegate

- (void)applicationDidFinishLaunching:(NSNotification *)aNotification {
    NSString *mainAPP = @"org.skyfox.iSimulator";
    
//    NSArray *runningArray = [NSRunningApplication runningApplicationsWithBundleIdentifier:mainAPP];
    BOOL alreadRunning = NO;
    NSArray *runnings = [NSWorkspace sharedWorkspace].runningApplications;
    for (NSRunningApplication *app in runnings) {
        if ([app.bundleIdentifier isEqualToString:mainAPP]) {
            alreadRunning = YES;
            break;
        }
    }
    
    if (!alreadRunning) {
        [[NSDistributedNotificationCenter defaultCenter] addObserver:self
                                                            selector:@selector(terminate) name:@"killme" object:mainAPP];
        
        NSString *appPath = [[NSBundle mainBundle] bundlePath];
        appPath = [appPath stringByReplacingOccurrencesOfString:@"/Contents/Library/LoginItems/iSimulatorHelper.app" withString:@""];
        appPath = [appPath stringByAppendingPathComponent:@"Contents/MacOS/iSimulator"];

        if (![[NSFileManager defaultManager] fileExistsAtPath:appPath])
        {
            return;
        }
        [[NSWorkspace sharedWorkspace] launchApplication:appPath];
    }else{
        [self terminate];
    }
}

- (void)terminate{
    [NSApp terminate:nil];
}

判断是不是开机自启动

- (BOOL)isStartAtLogin {
    NSDictionary *dict = (__bridge NSDictionary*)SMJobCopyDictionary(kSMDomainUserLaunchd,
                                                            CFSTR("org.skyfox.iSimulatorHelper"));
    BOOL contains = (dict!=NULL);
    return contains;
}

对应的终端查看命令

launchctl print-disabled "user/$(id -u)"

其他问题

当关闭开机启动的时候,发现console.app中还会显示这些log

Feb 24 10:51:57 Jakey-mini com.apple.xpc.launchd[1] (org.skyfox.iSimulatorHelper[797]): Could not resolve CFBundleIdentifier specified by service: -10814: org.skyfox.iSimulatorHelper
Feb 24 10:51:57 Jakey-mini com.apple.xpc.launchd[1] (org.skyfox.iSimulatorHelper): Service only ran for 0 seconds. Pushing respawn out by 10 seconds.

手动编辑配置文件删除:

sudo /Applications/Xcode.app/Contents/MacOS/Xcode "/private/var/db/com.apple.xpc.launchd/loginitems.$(id -u).plist"
sudo /Applications/Xcode.app/Contents/MacOS/Xcode "/private/var/db/com.apple.xpc.launchd/disabled.$(id -u).plist"

launchctl remove com.annoying.service

重启, 运行

launchctl print-disabled "user/$(id -u)"

确认列表中没有你的helper


注意:你的主程序必须在Application的目录下,开机启动的设置才会生效,否则会失败。并且主app要用开发者证书打包。


https://developer.apple.com/library/content/documentation/MacOSX/Conceptual/BPSystemStartup/Chapters/CreatingLoginItems.html

https://developer.apple.com/library/content/documentation/Security/Conceptual/AppSandboxDesignGuide/DesigningYourSandbox/DesigningYourSandbox.html

转载请注明:天狐博客 » Cocoa开发之APP开机自启动

Cocoa开发把APP移动到/Applications文件夹

$
0
0

虽然说macOS app可以再任何地方运行,但是很多功能得要求app在Applications下才能好使,比如自动运行什么的功能

我还在想自己敲一个提示框.没想到已经有人实现了.

- (void)applicationDidFinishLaunching:(NSNotification *)aNotification
{
    PFMoveToApplicationsFolderIfNecessary(); 
}

但是不支持上架后的沙盒应用.很遗憾

https://github.com/potionfactory/LetsMove

转载请注明:天狐博客 » Cocoa开发把APP移动到/Applications文件夹

Apple向热更新下达最后通牒

$
0
0

之前开发者都收到了苹果2017年的新开发者审核协议更新通知

2017年3月8...注意..是女神节这天。大量开发者收到了被拒绝 被警告的邮件,内容如下:

Dear Developer,

Your app, extension, and/or linked framework appears to contain code designed explicitly with the capability to change your app’s behavior or functionality after App Review approval, which is not in compliance with section 3.3.2 of the Apple Developer Program License Agreement and App Store Review Guideline 2.5.2. This code, combined with a remote resource, can facilitate significant changes to your app’s behavior compared to when it was initially reviewed for the App Store. While you may not be using this functionality currently, it has the potential to load private frameworks, private methods, and enable future feature changes.

This includes any code which passes arbitrary parameters to dynamic methods such as dlopen(), dlsym(), respondsToSelector:, performSelector:, method_exchangeImplementations(), and running remote scripts in order to change app behavior or call SPI, based on the contents of the downloaded script. Even if the remote resource is not intentionally malicious, it could easily be hijacked via a Man In The Middle (MiTM) attack, which can pose a serious security vulnerability to users of your app.

Please perform an in-depth review of your app and remove any code, frameworks, or SDKs that fall in line with the functionality described above before submitting the next update for your app for review.

Best regards,

App Store Review

苹果审核协议中有这样一节:

Apple Developer Program License Agreement
3.3.2 An Application may not download or install executable code. Interpreted code may only be
used in an Application if all scripts, code and interpreters are packaged in the Application and not
downloaded. The only exception to the foregoing is scripts and code downloaded and run by Apple's builtin WebKit framework, provided that such scripts and code do not change the primary purpose of the Application by providing features or functionality that are inconsistent with the intended and advertised purpose of the Application as submitted to the App Store.

App Store Review Guideline
2.5.2 Apps should be self-contained in their bundles, and may not read or write data outside the designated container area, nor may they download, install, or execute code, including other iOS, watchOS, macOS, or tvOS apps.

随后JSPatch群里 ,github上都炸了锅 : https://github.com/bang590/JSPatch/issues/746

react-native 的情况 :https://github.com/facebook/react-native/issues/12778

Weex ::https://github.com/alibaba/weex/issues/2875

JSPatch的作者bang也收到了邮件:


为什么突然爆发

突然爆发并非偶然,苹果的审核指南一直明确,禁止下载可执行代码,虽然JSPatch等库使用了JavaScriptCore来巧妙的实现,但也不是长久之计,很多开发者不自觉的使用其来下发私有方法等等行为迟早会被苹果发现。也极大的威胁到了极其注重安全的苹果

再有就是一切涉及到网络的都会有安全的风险

还有一个有意思的事实,昨天VS2017发布,号称内置iOS模拟器,直接开发React Native:

所以很多人也得出了一个灾难性结论"苹果封杀混合开发",JSPatch等热更新是误伤....

总结下波及到的库

rollout,react native,weex,JSPatch,bugtags,个推 ,bugly with hotfix

查看是否使用热更新

最直接当然是查看有没有JSPatch等热更新的库。

但是很多第三方也内部集成了JSPatch,这时只能用脚本find一下了

grep -r JSPatch .

为什么没使用热更新会收到邮件

个人认为苹果是批量扫描runtime并且群发的,苹果没办法批量检测remote script(远程脚本下载)

所以机智的检测热更新可能使用到的runtime方法,比如method_exchangeImplementations。这样基本全覆盖了那些使用热更新的APP。

警告"下载脚本代码且使用runtime方法实现的的APP"下一个版本改掉,如果不改。有可能被下架被拒绝上架。

JSPatch是"下载脚本代码且使用runtime",并不是针对JSPatch一个库

rollout,react native,weex都会有这种提示。

bugtags ,个推 这种看似没有热更新的其实内部集成了JSPatch等库,也会有这种提示

Runtime不能继续用了?

个人认为原生代码中使用runtime还是没问题,只是为了提醒那些使用了runtime并且下载远程脚本改变app行为的人。

如果苹果把runtime变成私有方法或去掉.那么Objective-C的优势大大的没有了.....

怎么解决?

如果是类JSPatch这种只用来热更新的,暂时去掉这些热更新的库吧,或者观望阵子再上架新包。

如果是类React Native,抓紧转行吧。。哈哈哈(我开玩笑的。。。)

转载请注明:天狐博客 » Apple向热更新下达最后通牒

Cocoa开发之NSWorkspace

$
0
0

NSWorkspace

NSWorkspace继承自NSObject,属于AppKit.framework。一个NSWorkspace对象可以启动其他应用程序和执行各种文件处理服务。

概述

每一个App中有个一个共享的  NSWorkspace 对象,可以使用类方法sharedWorkspace去访问他,例如, 下边的语句使用 NSWorkspace 对象请求一个可以被TextEdit App打开的文件: [crayon-58cba2d2a4508963854206/]
你可以使用workspace对象做这样几件事:
  • 打开, 操作, 获取关于files与devices的信息
  • 跟踪文件系统的改变,设备和用户数据库
  • 获取或者设置文件Finder信息
  • 启动APP

遗留的常量

表1,描述了包含关于应用程序的信息的NSDictionary对象所有的 keys 。NSDictionary被activeApplication和launchedApplications返回,也是NSWorkspace通知应用程序启动和终止提供的用户信息。注意,这些常量被认为是遗留的。

 注意

强烈建议您在应用target macOS 10.6和以后,使用NSWorkspace类的runningApplications方法和NSRunningApplication类方法去检索这些信息,而不是使用activeApplication和launchedApplications方法。
表 1 用户信息字典的keys,通知应用启动与终端方法activeApplication 和 launchedApplications的用户信息字典的keys
Key Value
@"NSApplicationPath" app的全路径,一个NSString对象
@"NSApplicationName" app的名称,一个NSString对象
@"NSApplicationBundleIdentifier" app的bundle identifier,一个NSString对象
@"NSApplicationProcessIdentifier" object. app的进程id,一个NSNumber对象
@"NSApplicationProcessSerialNumberHigh"
长度进程序列(PSN),一个NSNumber对象
@"NSApplicationProcessSerialNumberLow" 长度进程序列(PSN), 一个NSNumber对象

符号

访问共享NSWorkspace实例

+ sharedWorkspace

访问NSWorkspace通知中心

@property(readonly, strong) NSNotificationCenter *notificationCenter;

打开文件

  • - openURL:,打开指定的ULR ,例如使用默认浏览器打开一个网址   [[NSWorkspace sharedWorkspace] openURL:[NSURL URLWithString:@"http://www.skyfox.org"]]
  • - openFile:  ,根据文件类型使用默认的app打开指定的文件
  • - openFile:withApplication:  ,使用指定的app打开文件
  • - openFile:withApplication:andDeactivate:  使用指定的app打开文件,  andDeactivate传入YES,如果发送请求前app在后台禁用,允许已经打开的app到前台。
  • - openFile:fromImage:at:inView:   已废弃

操作应用程序

  • - launchApplication: 运行指定的app
  • - launchApplication:showIcon:autolaunch: ·使用附加的属性运行指定的app
  • - launchApplicationAtURL:options:configuration:error: 指定的url运行app
  • - hideOtherApplications 隐藏其他发送者的所有应用程序

操作文件

  • - duplicateURLs:completionHandler: 以 Finder 操作相同方式异步复制指定URL
  • - recycleURLs:completionHandler: 以 Finder 操作相同方式,移动指定的url到废纸篓
  • - performFileOperation:source:destination:files:tag: 在一个特定的目录中执行对一组文件的文件操作
  • - activateFileViewerSelectingURLs: 激活Finder,根据指定的多个文件,打开一个或者多个windows并且选中他们。
  • - selectFile:inFileViewerRootedAtPath: 根据文件夹全路径选择文件

操纵统一类型标识符信息 Uniform Type Identifier

  • - typeOfFile:error: 返回指定文件的统一类型标识符,如果他能被探测到的话。
  • - localizedDescriptionForType: 返回指定统一类型标识符的本地化描述
  • - preferredFilenameExtensionForType: 返回指定统一类型标识符的文件后缀名
  • - filenameExtension:isValidForType: 返回是否指定文件后缀是否适合统一类型标识符
  • - type:conformsToType:  返回一个布尔值表示第一个统一类型标识符是否符合第二个统一类型标识符。
  • - URLForApplicationWithBundleIdentifier:  返回相对于app指定标识符的url

请求的信息

  • - getInfoForFile:application:type: 检索指定的文件的信息。
  • - URLForApplicationToOpenURL:  返回将用于打开给定的URL的默认的app的URL。
  • - fullPathForApplication: 返回指定app的全路径
  • - getFileSystemInfoForPath:isRemovable:isWritable:isUnmountable:description:type:  用fullPath描述文件系统。
  • - isFilePackageAtPath:  确定指定的路径是不是一个文件包。
  • @property(readonly, strong) NSRunningApplication *frontmostApplication;    返回最前面的应用程序,接收事件的app。
  • @property(readonly, copy) NSArray<NSRunningApplication *> *runningApplications;  , 返回正在运行的app
  • @property(readonly, strong) NSRunningApplication *menuBarOwningApplication; 返回属于当前显示的menubar的app

管理图标

  • - iconForFile: 返回指定文件包含的图标图片
  • - iconForFileType: 返回指定类型指定文件包含的图标文件
  • - iconForFiles: 返回指定多个文件包含的图标文件
  • - setIcon:forFile:options: 带着附加的选项,为指定的路径文件或者目录 设置图标

卸载设备

  • - unmountAndEjectDeviceAtPath:  在指定的路径卸载和弹出设备。
  • - unmountAndEjectDeviceAtURL:error:  尝试弹出安装指定路径的

管理Bundles

  • - absolutePathForAppBundleWithIdentifier: 返回一个app bundle在文件系统的绝对路径
  • - launchAppWithBundleIdentifier:options:additionalEventParamDescriptor:launchIdentifier:  指定 bundleIdentifier启动应用程序
  • - openURLs:withAppBundleIdentifier:options:additionalEventParamDescriptor:launchIdentifiers: 从一个url数组打开一个或者多个文件

管理桌面图片

  • - desktopImageURLForScreen:  返回给定屏幕的桌面图片
  • - setDesktopImageURL:forScreen:options:error:  指定给定的屏幕与图片url,为桌面设置图片
  • - desktopImageOptionsForScreen: 返回给定屏幕的桌面图片选项

执行Finder Spotlight搜索

  • - showSearchResultsForQueryString:   显示 Spotlight 搜索结果窗口

Finder文件标签

  • @property(readonly, copy) NSArray<NSColor *> *fileLabelColors; 返回相应文件在颜色数组中的文件标签
  • fileLabels 返回标签的数组

跟踪文件系统的改变

  • - noteFileSystemChanged:  通知workspace对象,文件系统在指定的路径发生变化。

注销前请求额外的时间

  • - extendPowerOffBy: 当关闭电源注销用户的时候,请求系统等待自定数量的时间

支持可访问性

  • @property(readonly) BOOL accessibilityDisplayShouldDifferentiateWithoutColor; 一个布尔值,该值指示应用程序是否应避免通过单独的颜色展示信息。
  • @property(readonly) BOOL accessibilityDisplayShouldIncreaseContrast; 一个布尔值,该值指示应用程序是否应该显示高对比度的用户界面。
  • @property(readonly) BOOL accessibilityDisplayShouldReduceTransparency; 一个布尔值,该值指示应用程序是否该避免使用半透明的背景。

废弃的方法

- openTempFile: - findApplications - noteUserDefaultsChanged - slideImage:from:to: - checkForRemovableMedia - noteFileSystemChanged - fileSystemChanged - userDefaultsChanged - mountNewRemovableMedia - mountedRemovableMedia - mountedLocalVolumePaths - activeApplication - launchedApplications

常量

Notifications

所有的NSWorkspace 通知 都是被 NSWorkspace 对象自己的通知中心POST, 不是app的默认notification center. 通过NSWorkspace 对象的 notificationCenter 属性访问通知中心.
  • NSWorkspaceWillLaunchApplicationNotification  当Finder将要启动一个app时发送
  • NSWorkspaceDidLaunchApplicationNotification 当一个新app已经启动时发送
  • NSWorkspaceDidTerminateApplicationNotification 当app停止运行时发送
  • NSWorkspaceSessionDidBecomeActiveNotification  切换用户会话时候发送
  • NSWorkspaceSessionDidResignActiveNotification 切换出用户会话前发送
  • NSWorkspaceDidHideApplicationNotification 当Finder隐藏一个app时发送
  • NSWorkspaceDidUnhideApplicationNotification 当Finder显示隐藏app时发送
  • NSWorkspaceDidActivateApplicationNotification 当Finder将要激活app时发送
  • NSWorkspaceDidDeactivateApplicationNotification 当Finder停止app时发送
  • NSWorkspaceDidRenameVolumeNotification 当卷改变名称 或者更改挂载路径时发送,这些通常会同时更改,只发送一次通知
  • NSWorkspaceDidMountNotification 当新设备挂在时发送
  • NSWorkspaceWillUnmountNotification 当Finder将要卸载设备时发送
  • NSWorkspaceDidUnmountNotification 当Finder已经卸载设备时发送
  • NSWorkspaceDidPerformFileOperationNotification 当文件操作已经被接收app执行时发送
  • NSWorkspaceDidChangeFileLabelsNotification 当Finder文件标签或者颜色改变时发送
  • NSWorkspaceActiveSpaceDidChangeNotification 当发生空间变化时发送
  • NSWorkspaceDidWakeNotification 当机器从睡眠中唤醒后发送
  • NSWorkspaceWillPowerOffNotification 当用户请求注销或者机器已经断电时发送
  • NSWorkspaceWillSleepNotification 机器休眠前发送
  • NSWorkspaceScreensDidSleepNotification 机器锁屏前发送
  • NSWorkspaceScreensDidWakeNotification 机器解锁屏幕后发送
  • NSWorkspaceAccessibilityDisplayOptionsDidChangeNotification  当任何辅助功能显示选项更改时发送

实例属性

  • @property(readonly) BOOL accessibilityDisplayShouldInvertColors;
  • @property(readonly) BOOL accessibilityDisplayShouldReduceMotion;

实例方法

  • - openURL:options:configuration:error:
  • - openURLs:withApplicationAtURL:options:configuration:error:
原文:NSWorkspace - AppKit | Apple Developer Documentation

AppKit Framework Reference

$
0
0

AppKit

Cocoa开发常用框架,用来在macOS构建和管理您的应用程序的用户界面。响应用户交互和系统事件、 启用辅助功能,以及处理文件、 文本和图像。

概述

AppKit是一个包含你需要的所有对象,比如实现图形化,事件驱动的用户界面:windows、 面板、 按钮、 菜单、 滚动条、 和文本框。AppKit 为您处理所有的细节,为它有效地绘制在屏幕上。与硬件设备和屏幕缓冲区进行通信,绘图前清除屏幕区域和剪切视图。很多 AppKit 的类可能第一次看起来令人生畏。然而,大多数的 AppKit 类是您间接使用的支持类。你也有在哪一级使用 AppKit 的选择:

  • 使用 Interface Builder来创建用户界面对象到你的应用程序对象的链接。在这种情况下,你需要做的就是执行应用程序的类 — — 执行这些action和delegate的方法。例如,实现当用户选择菜单项时调用的方法。
  • 以编程方式控制的用户界面,这需要更多的熟悉 AppKit 类和protocols协议。例如,允许用户将图标从一个窗口拖到另一个需要一些编程并且熟悉 NSDragging...协议。
  • 通过设置 NSView 或其他类的子类来实现您自己的对象。当子类化 NSView 要你使用图形函数自己实现绘图的方法。子类化需要 AppKit 的工作原理有更深理解。

若要了解更多关于 AppKit,请查看NSApplication、 NSWindow 和 NSView 类,密切关注delegate方法。AppKit 的工作原理的深入了解,请参阅 NSResponder 和 RunLoop (NSRunLoop 在基础框架中)。

AppKit 类和协议

AppKit非常大,它包括超过 125 个类和协议。所有类都从基础框架 NSObject 类派生。下面简要描述AppKit其类和协议的一些主题。

封装Application

每个应用程序使用单个实例的 NSApplication 控制主事件循环,保持应用程序的窗口和菜单跟踪、 分发到相应的对象 (即,本身或其窗口之一) 事件、 autorelease 池设置和接收应用程序级别事件的通知。NSApplication 对象具有一个delegate(一个你分配的对象),当应用程序启动或终止,隐藏或激活,打开用户选定的文件等等会被通知。通过设置 NSApplication 对象delegate和你实现delegate方法,可以自定义您的应用程序的行为而不必子类化 NSApplication。

一般事件处理和绘图

NSResponder 类定义响应链,响应用户事件的对象的有序表。当用户单击鼠标按钮或按下一个键时,事件将生成并在响应链传递 寻找可以"回应"的对象。处理事件的任何对象必须从 NSResponder 类继承。核心 AppKit 类,NSApplication、 NSWindow 和 NSView,都是从 NSResponder 继承。

NSApplication 对象维护一个 NSWindow 对象列表 — — 一个用于每个属于应用程序的窗口 — — 与每个 NSWindow 对象维护 NSView 对象层次结构。视图层次结构用来在window内画图和处理事件窗口。NSWindow 对象处理窗口级别的事件、 将其他事件分发给他的视图 提供绘图区域给视图。NSWindow 对象还具有一个delegate,允许您自定义其行为。

NSView 是显示在一个窗口中的所有对象的抽象类。所有的子类实现绘图的方法,图形方法draw(_:) 是在创建一个新的 NSView 子类时覆盖的主要方法。

面板

NSPanel是NSWindow的子类, 类是您使用来显示瞬态、 全局或紧迫的信息。例如,您将使用 NSPanel,一个实例,而不是实例的 NSWindow,来显示错误消息或查询用户对特殊的情况下作出的反应。AppKit 实现一些常见的面板为您,如保存,打开和打印面板,用于保存,打开和打印文件。使用这些面板为用户提供一个一致的"外观和视觉"跨应用程序的常见操作。

菜单和游标

NSMenu、 NSMenuItem 和 NSCursor 的类定义的外观和行为的菜单和应用程序向用户显示的光标。

分组和滚动视图

NSBox、 NSScrollView 和 NSSplitView 的类提供对其他视图对象或集合的视图窗口中图形的"附着"。 NSBox 类,你可以在 windows 中的元素分组和绘制整个组周围的边框。NSSplitView 类可以让你"堆栈"视图垂直或水平,分摊到每个视图一定范围,sliding control允许用户重新分配视图之间的范围。NSScrollView 类和它的帮助器,NSClipView,提供一种滚动机制,以及让用户发起和控制滚动的图形对象。NSRulerView 类允许你将一把尺子和标记添加到滚动视图。

控制应用程序

NSControl 和 NSCell 类和及其子类定义一套共同的用户界面对象,如按钮、 滑块和浏览器,用户可以以图形方式操作,来控制您的应用程序的某些方面。特定的控制会影响在于你自己︰ 当控制"touched"时,它将action消息发送到目标对象。你通常使用Interface Builder设置这些targets和actions,由控件拖动到您的应用程序的控制对象或其他对象。此外可以以编程方式设置targets和actions。

NSControl 对象是与实现细节的绘制和处理事件的一个或多个 NSCell 对象相关联。例如,一个按钮包括一个 NSButton 对象和一个 NSButtonCell 对象。这种功能的分离的原因,主要是以允许 NSCell 类 NSControl 类被重用。例如,NSMatrix 和 NSTableView 可以包含多个不同类型的 NSCell 对象。

NSTableView 类以行和列的形式显示数据。NSTableView 是理想的但不是限于,显示数据库记录,其中行对应于每条记录,列包含记录的属性。用户可以编辑单个单元格和列进行重新排列。通过设置其delegate和数据源对象,可以控制行为和 NSTableView 对象的内容。

文本和字体

NSTextField 类实现一个简单的可编辑的text field,并且 NSTextView 类提供了更全面的编辑功能,为了更大的文本body。

NSTextView,抽象的 NSText 类的子类,Cocoa的扩展文本系统定义的接口。NSTextView 支持富文本、 附件 (图形、 文件和其他),输入的管理和键绑定,可标记文本属性。NSTextView 与字体面板和菜单、 rulers和段落样式、 服务设施 (例如,拼写检查服务) 和粘贴板工作。NSTextView 还允许自定义through delegation和notifications — — 你很少需要子类 NSTextView。你很少以编程方式创建 NSTextView, 由于 Interface Builder调色板上的对象,如 NSTextField、 NSForm 和 NSScrollView,已经包含 NSTextView 对象。

它也是可以做到更强大、 更具创造性的文本操作 (如在一个圆圈中显示文本) 使用 NSTextStorage、 NSLayoutManager、 NSTextContainer 和相关的类。

NSFont 和 NSFontManager 类封装和管理字体系列、 大小和变化。NSFont 类定义单个对象为每个不同的字体;为了提高效率,这些对象共享在您的应用程序中。NSFontPanel 类定义字体规格面板,呈现给用户。

图形和颜色

少量的编程,自定义view对象可以在任何地方被拖拽,成为这种拖拽机制的一部分的对象遵循NSDragging……协议:可拖动的对象遵循NSDraggingSource协议,目标对象(接收器)遵循NSDraggingDestination协议,AppKit隐藏了光标跟踪的所有细节,并且显示图像。

打印

NSPrintPanel,NSPrinter NSPageLayout,NSPrintInfo类共同提供关于您的应用程序显示在窗口和视图的打印信息。您还可以创建一个EPS NSView表示。

访问文件系统

使用NSFileWrapper类创建对象对应于磁盘上的文件或目录。NSFileWrapper将文件的内容保留在内存中,以便它可以显示,改变,或传播到另一个应用程序。它还提供了一个图标给拖动文件或代表它作为一个附件。或使用NSFileManager类的基础框架来访问和枚举文件和目录的内容。NSOpenPanel NSSavePanel类还提供了一种方便和熟悉的用户界面到文件系统。

与其他应用程序共享数据

NSPasteboard类定义了剪切板,一个从你的app中拷贝的数据的仓库,使这些数据提供给任何愿意使用它的app。NSPasteboard实现类似剪切-复制-粘贴的操作。

NSServicesRequest协议通过使用剪切板之间传递的数据进行应用程序通信的注册服务。

检查拼写

NSSpellServer类使你定义拼写检查服务并且提供服务给其他app,连接你的app到拼写服务,使用NSSpellChecker类,NSIgnoreMisspelledWords 和 NSChangeSpelling protocols支持拼写检查的机制。

国际化

如果应用程序是用于在多个世界的地区,其资源可能需要自定义,或"本地化" 为本地语言。例如,应用程序可能需要有单独的日语、 英语、 法语和德语版本的字符串、 图标、 nib 文件或相关的帮助。具体到特定语言的资源文件 (扩展名为".lproj"目录) bundle目录的一个子目录中被组合在一起。通常您使用Interface Builder设置本地化资源文件。有关本地化和资源的更多信息,请参见Bundle

符号

Classes NSATSTypesetter
NSAccessibility​Element
NSAction​Cell
NSAlert
NSAlignment​Feedback​Filter
NSAnimation
NSAnimation​Context
NSAppearance
NSApplication
NSArray​Controller
NSBezier​Path
NSBitmap​Image​Rep
NSBox
NSBrowser
NSBrowser​Cell
NSButton
NSButton​Cell
NSCIImage​Rep
NSCandidate​List​Touch​Bar​Item
NSCell
NSClick​Gesture​Recognizer
NSClip​View
NSCollection​View
NSCollection​View​Flow​Layout
NSCollection​View​Flow​Layout​Invalidation​Context
NSCollection​View​Grid​Layout
NSCollection​View​Item
NSCollection​View​LayoutNSCollection​View​Layout​Attributes
NSCollection​View​Layout​Invalidation​Context
NSCollection​View​Transition​Layout
NSCollection​View​Update​Item
NSColor
NSColor​List
NSColor​Panel
NSColor​Picker
NSColor​Picker​Touch​Bar​Item
NSColor​Space
NSColor​Well
NSCombo​Box
NSCombo​Box​Cell
NSControl
NSController
NSCursor
NSCustom​Image​Rep
NSCustom​Touch​Bar​Item
NSData​Asset
NSDate​Picker
NSDate​Picker​Cell
NSDictionary​Controller
NSDictionary​Controller​Key​Value​Pair
NSDock​Tile
NSDocument
NSDocument​Controller
NSDragging​Image​Component
NSDragging​Item
NSDragging​Session
NSDrawer
NSEPSImage​Rep
NSEvent
NSFile​Promise​Provider
NSFile​Promise​Receiver
NSFont
NSFont​Collection
NSFont​Descriptor
NSFont​Manager
NSFont​Panel
NSForm
NSForm​Cell
NSGesture​Recognizer
NSGlyph​Generator
NSGlyph​Info
NSGradient
NSGraphics​Context
NSGrid​CellNSGrid​ColumnNSGrid​RowNSGrid​ViewNSGroup​Touch​Bar​Item
NSHaptic​Feedback​Manager
NSHelp​Manager
NSImage
NSImage​Cell
NSImage​Rep
NSImage​View
NSLayout​Anchor
NSLayout​Constraint
NSLayout​Dimension
NSLayout​Guide
NSLayout​Manager
NSLayout​XAxis​Anchor
NSLayout​YAxis​Anchor
NSLevel​Indicator
NSLevel​Indicator​Cell
NSMagnification​Gesture​Recognizer
NSMatrix
NSMedia​Library​Browser​Controller
NSMenu
NSMenu​Item
NSMenu​Item​Cell
NSMutable​Font​Collection
NSMutable​Paragraph​Style
NSNib
NSObject​Controller
NSOpen​GLContext
NSOpen​GLLayer
NSOpen​GLPixel​Format
NSOpen​GLView
NSOpen​Panel
NSOutline​View
NSPDFImage​Rep
NSPDFInfo
NSPDFPanel
NSPICTImage​Rep
NSPage​Controller
NSPage​Layout
NSPan​Gesture​Recognizer
NSPanel
NSParagraph​Style
NSPasteboardNSPasteboard​ItemNSPath​CellNSPath​Component​Cell
NSPath​Control
NSPath​Control​Item
NSPersistent​Document
NSPop​Up​Button
NSPop​Up​Button​Cell
NSPopover
NSPopover​Touch​Bar​Item
NSPredicate​Editor
NSPredicate​Editor​Row​Template
NSPress​Gesture​Recognizer
NSPressure​Configuration
NSPrint​Info
NSPrint​Operation
NSPrint​Panel
NSPrinter
NSProgress​Indicator
NSResponder
NSRotation​Gesture​Recognizer
NSRule​Editor
NSRuler​Marker
NSRuler​View
NSRunning​Application
NSSave​Panel
NSScreen
NSScroll​View
NSScroller
NSScrubber
NSScrubber​Arranged​ViewNSScrubber​Flow​LayoutNSScrubber​Image​Item​ViewNSScrubber​Item​ViewNSScrubber​LayoutNSScrubber​Layout​AttributesNSScrubber​Proportional​LayoutNSScrubber​Selection​StyleNSScrubber​Selection​ViewNSScrubber​Text​Item​View
NSSearch​Field
NSSearch​Field​Cell
NSSecure​Text​Field
NSSecure​Text​Field​Cell
NSSegmented​Cell
NSSegmented​Control
NSShadow
NSSharing​Service
NSSharing​Service​Picker
NSSharing​Service​Picker​Touch​Bar​Item
NSSlider
NSSlider​AccessoryNSSlider​Accessory​Behavior
NSSlider​Cell
NSSlider​Touch​Bar​Item
NSSound
NSSpeech​Recognizer
NSSpeech​Synthesizer
NSSpell​Checker
NSSplit​View
NSSplit​View​Controller
NSSplit​View​Item
NSStack​View
NSStatus​Bar
NSStatus​Bar​Button
NSStatus​Item
NSStepper
NSStepper​Cell
NSStoryboard
NSStoryboard​Segue
NSString​Drawing​Context
NSTab​View
NSTab​View​Controller
NSTab​View​Item
NSTable​Cell​View
NSTable​Column
NSTable​Header​Cell
NSTable​Header​View
NSTable​Row​View
NSTable​View
NSTable​View​Row​Action
NSText
NSText​Alternatives
NSText​Attachment
NSText​Attachment​Cell
NSText​Block
NSText​Container
NSText​Field
NSText​Field​Cell
NSText​Finder
NSText​Input​Context
NSText​List
NSText​Storage
NSText​Tab
NSText​Table
NSText​Table​Block
NSText​View
NSTitlebar​Accessory​View​Controller
NSToken​Field
NSToken​Field​Cell
NSToolbar
NSToolbar​Item
NSToolbar​Item​Group
NSTouch
NSTouch​Bar
NSTouch​Bar​Item
NSTracking​Area
NSTree​Controller
NSTree​Node
NSTypesetter
NSUser​Defaults​Controller
NSView
NSView​Animation
NSView​Controller
NSVisual​Effect​View
NSWindow
NSWindow​Controller
NSWorkspace
Protocols NSAccessibility
NSAccessibility​Button
NSAccessibility​Check​Box
NSAccessibility​Contains​Transient​UI
NSAccessibility​Element​Protocol
NSAccessibility​Group
NSAccessibility​Image
NSAccessibility​Layout​Area
NSAccessibility​Layout​Item
NSAccessibility​List
NSAccessibility​Navigable​Static​Text
NSAccessibility​Outline
NSAccessibility​Progress​Indicator
NSAccessibility​Radio​Button
NSAccessibility​Row
NSAccessibility​Slider
NSAccessibility​Static​Text
NSAccessibility​Stepper
NSAccessibility​Switch
NSAccessibility​Table
NSAlert​Delegate
NSAlignment​Feedback​Token
NSAnimatable​Property​Container
NSAnimation​Delegate
NSAppearance​Customization
NSApplication​Delegate
NSBrowser​Delegate
NSCandidate​List​Touch​Bar​Item​Delegate
NSChange​Spelling
NSCloud​Sharing​Service​DelegateNSCloud​Sharing​Validation
NSCollection​View​Data​Source
NSCollection​View​Delegate
NSCollection​View​Delegate​Flow​Layout
NSCollection​View​Element
NSCollection​View​Section​Header​View
NSColor​Picking​Custom
NSColor​Picking​Default
NSCombo​Box​Cell​Data​Source
NSCombo​Box​Data​Source
NSCombo​Box​Delegate
NSControl​Text​Editing​Delegate
NSDate​Picker​Cell​Delegate
NSDictionary​Controller​Key​Value​Pair
NSDock​Tile​Plug​In
NSDragging​Destination
NSDragging​Info
NSDragging​Source
NSDrawer​Delegate
NSEditor
NSEditor​Registration
NSFile​Promise​Provider​Delegate
NSFont​Panel​Validation
NSGesture​Recognizer​Delegate
NSGlyph​Storage
NSHaptic​Feedback​Performer
NSIgnore​Misspelled​Words
NSImage​Delegate
NSInput​Server​Mouse​TrackerNSInput​Service​Provider
NSKey​Value​Binding​Creation
NSLayer​Delegate​Contents​Scale​Updating
NSLayout​Manager​Delegate
NSMatrix​Delegate
NSMenu​Delegate
NSMenu​Validation
NSOpen​Save​Panel​Delegate
NSOutline​View​Data​Source
NSOutline​View​Delegate
NSPage​Controller​Delegate
NSPasteboard​Item​Data​Provider
NSPasteboard​Reading
NSPasteboard​Writing
NSPath​Cell​Delegate
NSPath​Control​Delegate
NSPlaceholders
NSPopover​Delegate
NSPrint​Panel​Accessorizing
NSRule​Editor​Delegate
NSScrubber​Data​Source
NSScrubber​Delegate
NSScrubber​Flow​Layout​Delegate
NSSearch​Field​Delegate
NSSegue​Performing
NSServices​Menu​Requestor
NSSharing​Service​Delegate
NSSharing​Service​Picker​Delegate
NSSharing​Service​Picker​Touch​Bar​Item​Delegate
NSSound​Delegate
NSSpeech​Recognizer​Delegate
NSSpeech​Synthesizer​Delegate
NSSplit​View​Delegate
NSSpring​Loading​Destination
NSStack​View​Delegate
NSTab​View​Delegate
NSTable​View​Data​Source
NSTable​View​Delegate
NSText​Attachment​Cell​Protocol
NSText​Attachment​Container
NSText​Delegate
NSText​Field​Delegate
NSText​Finder​Bar​Container
NSText​Finder​Client
NSText​Input
NSText​Input​Client
NSText​Layout​Orientation​Provider
NSText​Storage​Delegate
NSText​View​Delegate
NSToken​Field​Cell​Delegate
NSToken​Field​Delegate
NSTool​Tip​Owner
NSToolbar​Delegate
NSToolbar​Item​Validation
NSTouch​Bar​Delegate
NSTouch​Bar​Provider
NSUser​Interface​Item​Identification
NSUser​Interface​Item​Searching
NSUser​Interface​Validations
NSValidated​User​Interface​Item
NSView​Controller​Presentation​Animator
NSWindow​Delegate
NSWindow​Restoration
NSWindow​Scripting
Reference NSApple​Script App​Kit Additions
App​Kit Functions
App​Kit Data Types
App​Kit ConstantsApp​Kit Enumerations
Structures NSApplication​Activation​Options
NSApplication​Occlusion​State
NSApplication​Presentation​Options
NSAutoresizing​Mask​Options
NSBitmap​Format
NSCell​Hit​Result
NSCell​Style​Mask
NSCloud​Kit​Sharing​Service​Options
NSCollection​View​Scroll​Position
NSColor​Panel​Options
NSDate​Picker​Element​Flags
NSDrag​Operation
NSDragging​Item​Enumeration​Options
NSEvent​Button​Mask
NSEvent​Mask
NSEvent​Modifier​FlagsNSEvent​PhaseNSEvent​Swipe​Tracking​OptionsNSFont​Collection​OptionsNSFont​Collection​Visibility
NSFont​Trait​Mask
NSGradient​Drawing​Options
NSLayout​Format​Options
NSMedia​Library
NSMenu​Properties
NSPDFPanel​Options
NSPasteboard​Contents​Options
NSPasteboard​Reading​Options
NSPasteboard​Writing​Options
NSPrint​Panel​Options
NSRemote​Notification​Type
NSSlider​Accessory​Width
NSSpring​Loading​Options
NSStatus​Item​Behavior
NSString​Drawing​Options
NSTable​Column​Resizing​Options
NSTable​View​Animation​Options
NSTable​View​Grid​Line​Style
NSText​List​Options
NSText​Storage​Edit​Actions
NSTouch​Bar​Customization​IdentifierNSTouch​Bar​Item​IdentifierNSTouch​Bar​Item​Priority
NSTouch​Phase
NSTouch​Type​Mask
NSTracking​Area​Options
NSTypesetter​Control​Character​Action
NSView​Controller​Transition​Options
NSWindow​Collection​Behavior
NSWindow​List​Options
NSWindow​Occlusion​State
NSWindow​Style​Mask
NSWorkspace​Icon​Creation​Options
NSWorkspace​Launch​Options
Extended Types CIColor
CIImage
Cocoa​Error
Cocoa​Error.Code
Index​Path
NSAffine​Transform
NSApple​Script
NSAttributed​String
Bundle
NSException​Name
File​Wrapper
NSIndex​Path
NSItem​Provider
NSMutable​Attributed​String
NSNotification.Name
NSObject
Run​Loop​Mode
NSSet
NSString
NSURL
URLResource​Values

转载请注明:天狐博客 » AppKit Framework Reference


iOS Xcode .bundle format unrecognized, invalid, or unsuitable

$
0
0

Xcode 8.2.1 (8C1002) 运行很来一个很老的项目,项目使用bundle与framework进行开发。出现bundle不能识别的信息:

CodeSign /Users/Jakey/Library/Developer/Xcode/DerivedData/Service-bulelefekgjaatgwhutjmmwiunir/Build/Products/Debug-iphonesimulator/RLResources.bundle
    cd "/Volumes/files/Service"
    export CODESIGN_ALLOCATE=/Applications/Xcode.app/Contents/Developer/Toolchains/XcodeDefault.xctoolchain/usr/bin/codesign_allocate
    export PATH="/Applications/Xcode.app/Contents/Developer/Platforms/iPhoneSimulator.platform/Developer/usr/bin:/Applications/Xcode.app/Contents/Developer/usr/bin:/usr/local/bin:/usr/bin:/bin:/usr/sbin:/sbin"
    
Signing Identity:     "-"

    /usr/bin/codesign --force --sign - --timestamp=none /Users/Jakey/Library/Developer/Xcode/DerivedData/Service-bulelefekgjaatgwhutjmmwiunir/Build/Products/Debug-iphonesimulator/RLResources.bundle

/Users/Jakey/Library/Developer/Xcode/DerivedData/vw-service-bulelefekgjaatgwhutjmmwiunir/Build/Products/Debug-iphonesimulator/RLResources.bundle: bundle format unrecognized, invalid, or unsuitable
Command /usr/bin/codesign failed with exit code 1

解决办法

TARGETS->选择出错的bundle的target->General->Identity  Choose info.plist File

选择对应出错bundle target目录中的xxx.plist文件

原因

个人猜测原来.bundle文件是不需要info.plist文件的,Xcode8校验更加严格,需要这个plist文件而且必须与build配置进行关联。如果build配置中没有plist被认为是无效的bundle,不完整的bundle。

Run!

转载请注明:天狐博客 » iOS Xcode .bundle format unrecognized, invalid, or unsuitable

基于HTTP/2与Token的APNs新协议

$
0
0

新的APNs协议基于HTTP/2,一种是使用Universal Push Notification Client SSL 证书,一种是使用Token,本文主要讲基于token的APNs协议。

基于HTTP/2与Token的 APNs 协议

APNs Provider(即,APP的后台) API 允许您向您的 iOS,macOS 设备上的应用程序和 Apple Watch 发送远程通知。API 基于 HTTP/2 网络协议。每个交互通过一个 POST 请求,包含 JSON 的有效Payload负载,通过服务器使用Auth Key生成服务端token连接APNs服务器,并且通过设备token发送负载。APNs然后转发给特定设备的指定应用程序。

  •  Request 和 Response 使用JSON通信
  • APNs支持状态码和返回 error 信息
  • APNs推送成功时 Response 将返回状态码200
  • APNs推送失败时,Response 将返回 JSON 格式的 Error 信息。
  • 最大推送长度提升到4096字节(4Kb)
  • 可以通过 “HTTP/2 PING ” 心跳包功能检测当前 APNs 连接是否可用,并能维持当前长连接。
  • 支持为不同的APP定义 “topic”(其实就得Bundle ID)
  • 多个推送App,只需要一个Apple Push APNs Auth Key

Apple Push Notification Authentication Key

2016年9月,苹果悄悄上线了token验证的推送方式,通过获得一个认证密钥(APNs Auth Key)去生成服务器端token,并且token非常容易生成,可以使用这些token令牌代替推送证书。一个认证密钥可用于多个应用程序并且永远不过期。每一个需要推送的App都需要配置推送证书的时代过去了。but,大部分第三方推送服务商,目前都没有升级到APNs Auth Key Token模式。

Auth key 生成

开发者网站证书页面:https://developer.apple.com/account/ios/certificate/key

选择Apple Push Notification Authentication Key (Sandbox & Production)并且点击页面底部的Continue

网站会生成包含APNs Auth Key的.p8密钥文件,下载下来APNsAuthKey_xxxxxxx.p8后续连接APNS使用。

协议说明

这种方式适合在基于HTTP/2协议的Provider使用,它与APNs之间的连接通过JWT(JSON web tokens)来验证。在这种方式下不需要使用证书+私钥的方式来建立可靠连接。Provider只需要提供一对公私钥(私钥给APNs保存,公钥Provider自己保存),并使用其中的私钥生成并加密JWT Token,每次向APNs请求推送的时候带上这个Token即可。token必须定期更新,每一个APNs provider验证token有效期为一个小时。

具体步骤如下:

  1. Provider通过TLS向APNs发起请求。
  2. APNs返回一个证书给Provider。
  3. Provier验证这个证书。通过后,发送push数据并带上JWT token。
  4. APNs验证token,并返回请求的结果。

重要:

建立TLS连接必须要有一个GeoTrust Global CA root certificate,在macOS中,这个证书已经安装在keychain中,如果是其他操作系统则可以在GeoTrust Root Certificates website下载。

HTTP/2请求APNs

HTTP/2 请求字段
字段名 字段值
:method POST
:path /3/device/<device-token>

对于 <device-token> 参数,指定目标设备的十六进制字节。

APNs需要使用 HPACK (HTTP/2 的报头压缩),防止重复的标题键和值。APNs为HPACK维护一个小的动态表。为了避免填满了APNs HPACK表,因而必须丢弃表数据,编码headers以下列方式 — — 尤其是当发送大量的流︰

:method 必须为POST

:path 值应编码为一个header中的一个文本字段,没有索引

authorization 请求header,如果存在,应编码为一个header中的一个文本字段,没有索引

apns-id、 apns-expiration,和 apns-collapse-id 不同的编码取决于它是否是第一次初始请求或随后的 POST 操作的一部分,如下︰

第一次发送请求头的时,使增量索引编码允许头名称加入动态表中

子请求发送头时,编码成header中的一个文本字段,没有索引

请求头

APNs 请求头 http headers
Header 头 描述
authorization 提供的发送到指定(app)主题通知的APNs验证token,token是以Base64 URL编码的JWT格式。指定为bearer <provider token>

当使用证书连接的时候,这个请求头将会被忽略

apns-id 一个规范的的 UUID 用来标识通知。如果发送通知时发生错误,APNs 使用此值来标识通知,通知到您的服务器。

规范的格式是 32 个小写的十六进制数字,由连字符分隔为5,8-4-4-4-12。UUID一个例子如下:

123e4567-e89b-12d3-a456-42665544000

如果您省略这个头,一个新的UUID由APNs创建并且在response中返回

apns-expiration 通知过期时间,秒级的UTC时间戳,这个header标识通知 从何时起不再有效,可以丢弃。

如果这个值非零,APNs保存通知并且尽量至少送达一次。如果无法第一时间送达,根据需要重复尝试。

如果这个值为0,APNs认为通知立即过期,不会存储与重新推送。

apns-priority 通知的优先级,指定以下值:
  • 10–立即推送消息. 这个优先级的通知必须再目标设备上触发alert, 声音, 或者badge . 仅仅包含content-available key使用此优先级是错误的。
  • 5—一次性发送通知,需要考虑设备的电量。具有此优先级的通知可能分组推送并且几种爆发推送  Notifications with this priority might be grouped and delivered他们会被节流并且某些情况下送达

如果省略这个头,APNs服务器会把优先级设置为10

apns-topic 远程通知的主题,通常是你App的bundle id,在开发者账号中创建的证书必须包含此bundle id

如果证书包含多个主题,这个头必须指定一个值

如果省略此头并且APNs证书不包含指定的主题,APNs服务器使用证书的Subject作为默认主题。

如果使用token代替证书,必须指定此头,提供的主题应该被在开发者账号中的team提供。即bundle id的app应该与auth key同属于一个开发者组。

apns-collapse-id 具有相同的折叠标识符的多个通知推送给用户合并显示为单个通知。比如: apns-collapse-id : 2 ,那么value为2的消息将被APNS合并成一条消息推送给设备。此关键字的值不能超过 64 个字节。更多的信息,请参阅Quality of Service, Store-and-Forward, and Coalesced Notifications

Provider Authentication Tokens

关于JWT(JSON Web Token)的详细资料可以通过这里了解。同时也可以从这里找到一些现成可用的库。

下面对JWT进行详细的介绍,一个JWT实际上是一个JSON对象,它的头部必须包含:

  • 用以加密token的加密算法(alg) ,比如:ES256。
  • 10个字符长度的标识符(kid),(苹果开发者网站创建的APNs Auth Key详情中的key id)

同时他的claims payload部分必须包含:

  • issuer(iss) registered claim key,其值就是10个字符长的Team ID。
  • issued at (iat) registered claim key,其值是一个秒级的UTC时间戳。

比如:

{
    "alg": "ES256",
    "kid": "ABC123DEFG"
}
{
    "iss": "DEF123GHIJ",
    "iat": 1437179036
}

创建完这个token后,必须使用自己的私钥对其进行加密,然后再采用基于P-256曲线和SHA-256哈希算法的椭圆曲线数字签名算法(ECDSA)进行签名,并将alg键的值设置为ES256。(注意:APNs只支持ES256签名的JWT,否则会返回InvalidProviderToken(403)错误)

为了保证安全,APNs要求定期更新token,时间间隔为1小时,如果APNs发现当前的时间戳与iat值中的时间戳相比,大于一个小时,那么APNs会拒绝推送消息,并返回ExpiredProviderToken (403)错误。

请求体

body内容是将要推送的消息负载的JSON对象。body数据必须压缩最大大小 4 KB (4096 字节)。对于 (VoIP) 通知,body数据最大大小 5 KB (5120 字节)。
{ "aps" : { "alert" : "Hello HTTP/2" } }
有关负载中的具体请参阅Payload Key Reference

响应头

APNs 响应头 response headers
Header 名 Header值
apns-id apns-id从request得到, 如果request中没有此值, APNs服务器创建一个新的UUID并且在header中返回
:status HTTP状态码,HTTP status code.可能status codes, 参加下文

响应状态码

Status codes for an APNs response
Status code Description
200 成功
400 无效请求
403 证书错误或者验证token错误
405 :method 设置错误. 只支持 POST 请求
410 device token不在有效与topic
413 负载payload太大
429 服务端对于同一个device token发送了太多了请求
500 内部服务器错误
503 服务器关闭,不可用

使用

Sample request for a provider authentication token

HEADERS
  - END_STREAM
  + END_HEADERS
  :method = POST
  :scheme = https
  :path = /3/device/00fc13adff785122b4ad28809a3420982341241421348097878e577c991de8f0
  host = api.development.push.apple.com
  authorization = bearer eyAia2lkIjogIjhZTDNHM1JSWDciIH0.eyAiaXNzIjogIkM4Nk5WOUpYM0QiLCAiaWF0I
 jogIjE0NTkxNDM1ODA2NTAiIH0.MEYCIQDzqyahmH1rz1s-LFNkylXEa2lZ_aOCX4daxxTZkVEGzwIhALvkClnx5m5eAT6
 Lxw7LZtEQcH6JENhJTMArwLf3sXwi
  apns-id = eabeae54-14a8-11e5-b60b-1697f925ec7b
  apns-expiration = 0
  apns-priority = 10
  apns-topic = <MyAppTopic>
DATA
  + END_STREAM
    { "aps" : { "alert" : "Hello" } }

APNs Auth Key 与 shell

#!/bin/bash

# Get curl with HTTP/2 and openssl with ECDSA: 'brew install curl openssl'
curl=/usr/local/opt/curl/bin/curl
openssl=/usr/local/opt/openssl/bin/openssl

# --------------------------------------------------------------------------
# HostDevelopment = "https://api.development.push.apple.com"
# HostProduction = "https://api.push.apple.com"

deviceToken=b27371497b85611baf9052b4ccfb9641ab7fea1d01c91732149c99cc3ed9342f

authKey="./APNSAuthKey_ABC1234DEF.p8"
authKeyId=ABC1234DEF
teamId=TEAM123456
bundleId=com.example.myapp
endpoint=https://api.development.push.apple.com

read -r -d '' payload <<-'EOF'
{
   "aps": {
      "badge": 2,
      "category": "mycategory",
      "alert": {
         "title": "my title",
         "subtitle": "my subtitle",
         "body": "my body text message"
      }
   },
   "custom": {
      "mykey": "myvalue"
   }
}
EOF

# --------------------------------------------------------------------------

base64() {
   $openssl base64 -e -A | tr -- '+/' '-_' | tr -d =
}

sign() {
   printf "$1"| $openssl dgst -binary -sha256 -sign "$authKey" | base64
}

time=$(date +%s)
header=$(printf '{ "alg": "ES256", "kid": "%s" }' "$authKeyId" | base64)
claims=$(printf '{ "iss": "%s", "iat": %d }' "$teamId" "$time" | base64)
jwt="$header.$claims.$(sign $header.$claims)"

$curl --verbose \
   --header "content-type: application/json" \
   --header "authorization: bearer $jwt" \
   --header "apns-topic: $bundleId" \
   --data "$payload" \
   $endpoint/3/device/$deviceToken

后续更新其他语言推送方法。

参考资料

CommunicatingwithAPNs

http://thrysoee.dk/apns/


转载请注明:天狐博客 » 基于HTTP/2与Token的APNs新协议

Bundle打包Could not load the "XXX" image referenced from a nib in the bundle with identifier XXX

$
0
0

啊啊啊,这个问题遇到好多次,但是时间长了今天居然忘了怎么回事了。

把storyboard与xib 与图片资源都打入自定义bundle中,在nib文件中图片可以正常显示。

当run起了的时候会提示Could not load the "XXX" image referenced from a nib in the bundle with identifier XXX

排查

右键Products中的主工程,show in  finder,显示包内容。确认打包后的app中包含xxx.bundle.

右键xxx.bundle显示包内容。发现所有的图片都被变成了.tiff格式。

解决

bundle target => build setting =>COMBINE_HIDPI_IMAGES 从YES设置成NO即可


转载请注明:天狐博客 » Bundle打包Could not load the "XXX" image referenced from a nib in the bundle with identifier XXX

老站长为什么才开头条号?

$
0
0

虽然接触计算机比较早。但是仍然思维受限,很难想象零几年的时候,互联网刚刚兴起,而我恰好是一个计算机爱好者,又凑巧我对网站,对黑客技术,反着一切计算机事物(PS,除了游戏)都都很感兴趣。自然而然申请了自己的网站,更难想象,我的网站是在一个网站上申请的二级域名(后来几年才知道独立域名的概念)。页面也不能随便自定义。

几年后,我意识到。要做一个完全属于自己的网站,因为喜欢计算机,网站也是做计算机相关的。自然而然也就变成了个人站长,站长嘛就得鼓捣,搜索引擎优化seo与html,切图等前端技术。碰巧家里是做建筑行业的,所以photoshop,autocad,3dmax等软件在刚刚接触计算机的时候就开始玩了。每天不停的更新文章,建立QQ群解答问题。玩的不亦乐乎。当然啦,做网站也得需要成本的,当然前期是赚不到钱的,所以由于成本与认知上的限制。第一个网站就关掉了。留下的只有计算机的QQ群很多个,而且是爆满的状态。

随后进入大学,自然而然的进入了计算机学校。系统的接触计算机与互联网。发现之前的所谓的计算机技术相对全新的知识,玩的太片面,随后直接解散群,转让群。

慢慢的启动资金也相对多了起来,于是开始第二个 第三个网站的建立,网站大多偏向于文字类,QQ资源类的内容为主导的站点。
功夫不负有心人随着seo技术与持续的努力终于把百度指数近两万的关键词,做到了搜索结果的第一页。这时候,一切都是那么的自然,ip与pv呈指数增长,引用一个词描述我的网站是 “流量为王”,我尝试的加入百度联盟的广告。效果是显而易见的,每天都有大两位的收入,持续了两年时间后。

移动互联网的兴起,并没有引起我的注意,一直认为PC是我最大的流量入口,完全没有考虑到移动的力量。所以从网站数据来看,移动越来越重要,但是同时由于百度对伪原创文章的惩罚力度大大加大。结果就是网站被K(就是加入黑名单),所以最后一个网站也是处于关闭状态,处于半死不活的状态。但是这就是我的互联网第一桶金。

总结一下失败的原因就是,传统的“流量为王”至关重要的同时,随着大量网站的兴起,内容同样重要。所以就诞生了“内容为王”。

虽然说移动互联网的火热,但是我还是并没有care他们,微信公众号刚刚发布我也顺利的也成为了第一批用户,但是并没有进行内容更新,我发现之前的思路以及行不通了,原创内容才是王道。

另一条线上,我同事也一直从事计算机工作,进行移动端App开发等等,也一直写着自己的博客,把自己的经验分享给大家。但是随之我发现一个问题,网站的流量还是靠搜索,并不能主动推送给更多需要的人。

也许自认为人要有调性,不能随波逐流,微博这个时代的产物,我并不感兴趣,也不喜欢所谓的社交圈,粉丝经济。
最近几次当我试着把自己的东西通过微博分享出去,一个一个@所谓的业内大v的时候,人家并不care你,原因很简单,你是谁,突然冒出来我为什么转发,再有可能就是你的东西的确是个渣渣。但是当他们圈内的某个人发个东西的时候,一群所谓的大v就来各种转发了,额。。虽然东西并不怎么样。

头条虽然我每会花很多时间去看,去分享,直到最近,萌生了,开个头条号的想发。文字内容的缺乏营养现在很多人不会看了,甚至纯文字的也已经要out了,短视频领域的确是一个难得的机会。but,我并没有什么好的idea,暂时没有这个打算。
反而原创内容我可以写,站长技术,计算机技术,网络技术,一切的一切资源都是那么的多。不能再浪费了。开个自媒体,干!

转载请注明:天狐博客 » 老站长为什么才开头条号?

为什么玩域名的总想做站?而做站的总会去玩域名?

$
0
0

当我兴致勃勃的开始做一个又一个站的时候,域名的选择常常都是很随意,随着seo等知识面的扩大,会发现“一个好域名是一个站成功的基础”,随后的时间里,选域名会花费大量的时候,慢慢的从站长变成了米农(域名爱好者的昵称,域名也成为玉米)

米农

米农的日常

  • 第一位当然是出售自己的域名。
  • 天天在各种域名QQ群,域名城,去发现其他人出售的域名。
  • 在金米等平台关注然后抢注将要过期删除的域名。
  • 经常看新闻、了解国际大事、最新流行趋势,特别是科技新闻
  • 网上科技新产品的消息,比如智能手机、流行语等等,分析这些词的潜在商业价值,快速抢注或者收购
  • 各种潜力股的公司建立或被收购的消息。
  • 批量一些只有在米农内部流通火热的域名类型,比如之前的数字域名。

米农的必备素养

  • 坚信价值投资,含义为王
  • 眼疾手快
  • 知识面广

为什么米农总想去做站

一个域名好不好,不应仅仅凭自己的个人意识和判断,不应该认为自己喜欢就好。当然你纯粹是为了玩而玩那随意你了。

而应从该域名是否有商业价值、是否适合建站等角度考虑。

但是适合建站不是适合你自己建站,而是考虑别人做站,终端做站。

往往很多米农都是认为适合自己做站而拿下域名,久而久之就想自己做站。期待着一炮而红。结果也是半途而费。

站长

站长的日常

  • 发布文章
  • SEO
  • 换友链
  • 查排名

站长的必备素养

  • 能坚持
  • 能吃苦
  • 眼光

为什么站长总想去玩域名

有些站长认为域名是成功的基础,只要有好的域名,一做一成功。所以陷入了思维定式,做站越来越没信心,认为没有好域名成功不了,结果又是半途而废。

每次有做站的“好想法”都有找不到合适域名不会去做的心态。久而久之,站长变成了米农。即便变成了米农,又以自己是站长的心态玩米,最终都砸在手里。然后自己做站。好米有了,idea也有了。。。。结果还是一样没做成。

最后

我自己也没能逃过这个怪圈,当回归理性的时候,发现一切都是在浪费时间。忙忙碌碌却碌碌无为。

做站长就踏踏实实的坚持,差不多的域名即可。一个站的成功贵在坚持。再有域名是可以换的!

做米农就要价值投资。域名自己非常喜欢的同时也要站在多方面的角度去感受。并不是有个好域名就能把站做成功。


转载请注明:天狐博客 » 为什么玩域名的总想做站?而做站的总会去玩域名?

iOS开发之预读取网络图片尺寸

$
0
0

在进行iOS开发时,经常会遇到这种情况:

  • 常常想不下载图片,根据网络图片URL获取图片的尺寸。根据得到尺寸或者比例显示占位图片与轮廓预览区域。当完全下载下来图片后,替换上去。
  • TableView显示的时候要动态的设置Cell的高度,因为大量的图片不会一口气下载完成,所以想先拿到图片的高度把Cell的高度提前设置好。
  • 根据图片尺寸或比例动态创建控件

方法

1.服务端返回的JSON等等数据的时候不仅仅返回一个URL,额外返回一个字段描述图片大小。

{
    "object": {
        "image_url": "images/pic.jpg",
        "image_size": "222x255"
    }
}

2.返回图片URL时拼接该图片的宽高

比如http://xxx.com/images/pic_215x500.jpg,http://xxx.com/images/pic.jpg@215x500 ,http://xxx.com/images/pic_215_500.jpg,格式与服务器端约定好即可。

最好是上传图片的时候直接把尺寸拼接将要存储的图片文件,这样正常访问图片的url解析尺寸就行了。

3.HTTP响应头中写入图片的宽高

4.图片数据头中写入图片的宽高

此方法需要服务器支持Range分段请求,整个图片虽然很大,可能只需要很少的字节就能得到图片的大小

curl判断服务器是否支持Range请求

mac的终端下执行:

curl -i --rang 0-9 https://sqimg.qq.com/qq_product_operations/im/qqlogo/imlogo_b.png

返回

HTTP/1.1 206 Partial Content
Server: Qnginx/1.3.2
Date: Tue, 28 Mar 2017 05:19:13 GMT
Content-Type: image/png
Content-Length: 10
Connection: keep-alive
Cache-Control: max-age=2592000
Expires: Thu, 27 Apr 2017 05:19:13 GMT
Last-Modified: Tue, 29 Mar 2016 11:07:42 GMT
Content-Range: bytes 0-9/2148
Access-Control-Allow-Origin: *
X-Cache-Lookup: Hit From Disktank
X-NWS-LOG-UUID: bd8d7f0d-010c-4482-b535-6abefd2e893e

?PNG

输出结果 Accept-Ranges: bytes 或者statuscode等于206,说明服务器支持按字节下载。我们看到标准的返回中Content-Type就可以判断图片类型了。

iOS代码检测

+(BOOL)checkSupportResume:(NSURL*)url{
    NSMutableURLRequest *request = [NSMutableURLRequest requestWithURL:url];
    request.HTTPMethod = @"HEAD";//0-9 range
    //[request setValue:@"bytes=0-9" forHTTPHeaderField:@"Range"];
    NSURLResponse *response;
    [NSURLConnection sendSynchronousRequest:request returningResponse:&response error:nil];
    NSHTTPURLResponse *resp = (NSHTTPURLResponse*)response;
    //        NSLog(@"resp%@", [resp allHeaderFields]);
    //        NSLog(@"文件长度-%lld",response.expectedContentLength);
    BOOL support =  resp.statusCode ==206?YES:NO;
    return support;
}

iOS从图片数据头请求尺寸

常见图片的range

PngRange = @"bytes=16-23";
JPGRange = @"bytes=0-209";
GIFRange = @"bytes=6-9";

请求

NSMutableURLRequest *request = [NSMutableURLRequest requestWithURL:imgURL];
[request setValue:PngRange forHTTPHeaderField:@"Range"];
[NSURLConnection sendAsynchronousRequest:request queue:[NSOperationQueue mainQueue] completionHandler:^(NSURLResponse * _Nullable response, NSData * _Nullable data, NSError * _Nullable connectionError) {
      //data 即是图片的数据头
}];

尺寸解析

从数据头中解析图片的尺寸大同小异,也许每个人的方法具体算法不同,但是核心还是一样的。当然这么多代码肯定不是我写的。来自互联网。

PNG,png尺寸在16-23字节中,所以请求的时候只需要请求8字节即可解析出具体尺寸:

+ (CGSize)PNGImageSizeWithRangeHeader:(NSData *)data{
   int w1 = 0, w2 = 0, w3 = 0, w4 = 0;
    [data getBytes:&w1 range:NSMakeRange(0, 1)];
    [data getBytes:&w2 range:NSMakeRange(1, 1)];
    [data getBytes:&w3 range:NSMakeRange(2, 1)];
    [data getBytes:&w4 range:NSMakeRange(3, 1)];
    int w = (w1 << 24) + (w2 << 16) + (w3 << 8) + w4;
    int h1 = 0, h2 = 0, h3 = 0, h4 = 0;
    [data getBytes:&h1 range:NSMakeRange(4, 1)];
    [data getBytes:&h2 range:NSMakeRange(5, 1)];
    [data getBytes:&h3 range:NSMakeRange(6, 1)];
    [data getBytes:&h4 range:NSMakeRange(7, 1)];
    int h = (h1 << 24) + (h2 << 16) + (h3 << 8) + h4;

    return CGSizeMake(w, h);
}

GIF

+(CGSize)GIFImageSizeWithRangeHeader:(NSData *)data{
    short w1 = 0, w2 = 0;
    [data getBytes:&w1 range:NSMakeRange(0, 1)];
    [data getBytes:&w2 range:NSMakeRange(1, 1)];
    short w = w1 + (w2 << 8);

    short h1 = 0, h2 = 0;
    [data getBytes:&h1 range:NSMakeRange(2, 1)];
    [data getBytes:&h2 range:NSMakeRange(3, 1)];
    short h = h1 + (h2 << 8);
    return CGSizeMake(w, h);
}

JPG

+(CGSize)JPGImageSizeWithRangeHeader:(NSData *)data{
     if ([data length] <= 0x58) {
        return CGSizeZero;
    }

    if ([data length] < 210) {// 肯定只有一个DQT字段
        short w1 = 0, w2 = 0;
        [data getBytes:&w1 range:NSMakeRange(0x60, 0x1)];
        [data getBytes:&w2 range:NSMakeRange(0x61, 0x1)];
        short w = (w1 << 8) + w2;
        short h1 = 0, h2 = 0;

        [data getBytes:&h1 range:NSMakeRange(0x5e, 0x1)];
        [data getBytes:&h2 range:NSMakeRange(0x5f, 0x1)];
        short h = (h1 << 8) + h2;
        return CGSizeMake(w, h);
    } else {
        short word = 0x0;
        [data getBytes:&word range:NSMakeRange(0x15, 0x1)];
        if (word == 0xdb) {
            [data getBytes:&word range:NSMakeRange(0x5a, 0x1)];
            if (word == 0xdb) {// 两个DQT字段
                short w1 = 0, w2 = 0;
                [data getBytes:&w1 range:NSMakeRange(0xa5, 0x1)];
                [data getBytes:&w2 range:NSMakeRange(0xa6, 0x1)];
                short w = (w1 << 8) + w2;

                short h1 = 0, h2 = 0;
                [data getBytes:&h1 range:NSMakeRange(0xa3, 0x1)];
                [data getBytes:&h2 range:NSMakeRange(0xa4, 0x1)];
                short h = (h1 << 8) + h2;
                return CGSizeMake(w, h);
            } else {// 一个DQT字段
                short w1 = 0, w2 = 0;
                [data getBytes:&w1 range:NSMakeRange(0x60, 0x1)];
                [data getBytes:&w2 range:NSMakeRange(0x61, 0x1)];
                short w = (w1 << 8) + w2;
                short h1 = 0, h2 = 0;

                [data getBytes:&h1 range:NSMakeRange(0x5e, 0x1)];
                [data getBytes:&h2 range:NSMakeRange(0x5f, 0x1)];
                short h = (h1 << 8) + h2;
                return CGSizeMake(w, h);
            }
        } else {
            return CGSizeZero;
        }
    }
}

总结

从图片头中获取尺寸并不是一个高效的方法,耗费服务器性能,增加服务端负担。

其实如果是自己服务器的图片,采用url附带尺寸是非常好的选择。最好是上传图片的时候直接把尺寸拼接将要存储的图片文件名中。

转载请注明:天狐博客 » iOS开发之预读取网络图片尺寸

Cocoa开发之获取Keychain证书列表

$
0
0

通过Security.frameworks

- (IBAction)loadCerList1:(id)sender {
    NSDictionary *options = @{(__bridge id)kSecClass: (__bridge id)kSecClassCertificate,
                              (__bridge id)kSecMatchLimit: (__bridge id)kSecMatchLimitAll};
    CFArrayRef certs = NULL;
    __unused OSStatus status = SecItemCopyMatching((__bridge CFDictionaryRef)options, (CFTypeRef *)&certs);
    NSArray *certificates = CFBridgingRelease(certs);
    
    [self.onePopUpButton removeAllItems];
    
    for (int i=0;i<[certificates count];i++) {
        SecCertificateRef  certificate = (__bridge SecCertificateRef)([certificates objectAtIndex:i]);
        NSString *name =  CFBridgingRelease(SecCertificateCopySubjectSummary(certificate));
        [self.onePopUpButton addItemWithTitle:name];
        
    }
}

通过NSTask执行security find-identity

终端可以执行命令

security find-identity -v -p codesigning

所以Cocoa代码

(IBAction)loadCerList2:(id)sender {
    [self.twoPopUpButton removeAllItems];

    NSTask *certTask = [[NSTask alloc] init];
    [certTask setLaunchPath:@"/usr/bin/security"];
    [certTask setArguments:[NSArray arrayWithObjects:@"find-identity", @"-v", @"-p", @"codesigning", nil]];
    
    NSPipe *pipe = [NSPipe pipe];
    [certTask setStandardOutput:pipe];
    [certTask setStandardError:pipe];
    NSFileHandle *handle=[pipe fileHandleForReading];
    [certTask launch];
    [NSThread detachNewThreadSelector:@selector(watchGetCerts:) toTarget:self withObject:handle];
}
- (void)watchGetCerts:(NSFileHandle*)streamHandle {
    @autoreleasepool {
        
        NSString *securityResult = [[NSString alloc] initWithData:[streamHandle readDataToEndOfFile] encoding:NSASCIIStringEncoding];
        // Verify the security result
        if (securityResult == nil || securityResult.length < 1) {
            // Nothing in the result, return
            return;
        }
        NSArray *rawResult = [securityResult componentsSeparatedByString:@"\""];
        NSMutableArray *tempGetCertsResult = [NSMutableArray arrayWithCapacity:20];
        for (int i = 0; i <= [rawResult count] - 2; i+=2) {
            NSLog(@"i:%d", i+1);
            if (rawResult.count - 1 < i + 1) {
                // Invalid array, don't add an object to that position
            } else {
                // Valid object
                [tempGetCertsResult addObject:[rawResult objectAtIndex:i+1]];
                [self.twoPopUpButton addItemWithTitle:[rawResult objectAtIndex:i+1]];
            }
        }
    }
}


转载请注明:天狐博客 » Cocoa开发之获取Keychain证书列表


UserAgent用户标识详解与应用

$
0
0

什么是UserAgent

顾名思义,即用户 代理,简称UA,它是一个特殊的HTTP头域,使得服务器端能够识别客户端使用的操作系统及版本、CPU 类型、浏览器及版本、浏览器渲染引擎、浏览器语言、浏览器插件等。通过这个标识,用户所访问的网站可以显示不同的排版,进行不同的行为偏好设置,为用户提供更好的体验或者进行信息统计。通过修改useragent,你还可以完美的伪装:操作系统、浏览器、蜘蛛、邮件客户端、链接检查、分析器、RSS 阅读器等客户端的信息。

通过http://www.useragentstring.com/查看你的useragent,当然自己写一个web小脚本来输出useagent也是很容易的。

<?php
 echo $_SERVER['HTTP_USER_AGENT'];
?>

我的各浏览器useragent:

火狐useragent: Mozilla/5.0 (Macintosh; Intel Mac OS X 10.12; rv:52.0) Gecko/20100101 Firefox/52.0

Safari:Mozilla/5.0 (Macintosh; Intel Mac OS X 10_12_2) AppleWebKit/602.3.12 (KHTML, like Gecko) Version/10.0.2 Safari/602.3.12

Chrome:Mozilla/5.0 (Macintosh; Intel Mac OS X 10_12_2) AppleWebKit/537.36 (KHTML, like Gecko) Chrome/57.0.2987.110 Safari/537.36

UserAgent 用途

  • 信息统计
  • 服务器针对不同useragent显示或隐藏不同内容,电脑浏览器与安卓与iOS移动设备显示不同效果。
  • 客户端通过修改useragent来模拟其他浏览环境达到目的,比如很多不友好的网站只能使用ie进行访问,但是很多mac用户并没有ie,电脑访问wap网页。
  • 客户端爬虫伪装,常常可以与referer配合使用
  • 服务端使用useragent进行识别是否是用户操作,防止机器重复操作。当然还需要增加其他判断,否则很容易被模拟伪装
  • 为不同的搜索引擎蜘蛛展示不同的内容

UserAgent 含义剖析

标准格式为:      浏览器标识  (操作系统标识; 加密等级标识; 浏览器语言)    渲染引擎标识    版本信息

浏览器标识 由于很多网站在进行 UA 检测的时候忽略了两位数版本号,所以可能造成 浏览器及之后版本收到糟糕的页面,因此自 浏览器 10 之后的版本中浏览器标识项固定为 “浏览器”,在 UA 字串尾部添加真实版本信息。
操作系统标识 FreeBSD

X11; FreeBSD (version no.) i386
X11; FreeBSD (version no.) AMD64

Linux

X11; Linux ppc
X11; Linux ppc64
X11; Linux i686
X11; Linux x86_64

Mac

Macintosh; PPC Mac OS X
Macintosh; Intel Mac OS X

Solaris

X11; SunOS i86pc
X11; SunOS sun4u

Windows:

Windows

加密等级标识 N: 表示无安全加密
I: 表示弱安全加密
U: 表示强安全加密
浏览器语言 在浏览器中设置的指定的语言或者系统的语言。
渲染引擎 Presto/版本号,WebKit/版本号,Gecko/版本号
版本信息 显示 浏览器 真实版本信息,格式为: Version/版本号,Chrome/ChromeVersion Safari/SafariVersionChrome

UserAgent 修改

修改useragent的方式有很多,但是万变不离其宗。大体上有以下几类修改方式。

注册表修改

“HKEY_CURRENT_USER”Software”Microsoft”Windows”CurrentVersion”Internet Settings”5.0″User Agent”Post Platform”
“HKEY_LOCAL_MACHINE”SOFTWARE”Microsoft”Windows”CurrentVersion”Internet Settings”User Agent”Post Platform”
“HKEY_LOCAL_MACHINE”SOFTWARE”Microsoft”Windows”CurrentVersion”Internet Settings”5.0″User Agent”Post Platform”

如要修改IE的UserAgent为FireFox的,可以这么做:
UserAgent的默认值改为”Firefox”,同时在Post Platform下面新建字符串值”Firefox”=””,注意修改后需重启IE。

浏览器修改

浏览器类型 修改方法
Firefox 修改配置:

在地址栏输入“about:config”,按下回车进入设置菜单。
找到“general.useragent.override”,如果没有这一项,则点右键“新建”->“字符串”,输入这个字符串。
将其值设为自己想要的UserAgent。

响应式设计模式:

在开发者选项,响应式设计模式中,除了可以调整预览尺寸外,也可以自定义useragent

使用第三方:

User Agent Switcher插件修改

Opera 修改配置:

1.在地址栏输入“opera:config”,回车打开。
2.找到“User Agent”点开,里面的“Spoof UserAgent ID”设置想要的值,范围1-5。

0 Default
1 Opera
2 Mozilla, Opera detectable
3 Internet Explorer, Opera detectable
4 Mozilla, Opera hidden
5 Internet Explorer, Opera hidden

设置中修改:

1.工具栏“Tools”->“Preferences”->“Content”->“Advenced”,点击“Manage Site Preferences”按钮。
2.点击“Add”按钮,在弹出的窗口中“Site”填入“*”,“Network”选项卡中选择浏览器ID。具体对应的ID同上。

Maxthon 工具栏“工具”->“遨游设置中心”->“高级选项”,勾选“自定义 UserAgent 字符串”,下面写上自己的UserAgent记可。保存设置后重启Maxthon生效。
Chrome 早期的Chrome直接可以再开发者模式修改,担心最新版本已经去掉。只能用User Agent Switcher插件可视化修改了。

启动参数

启动时加上参数:-user-agent="UserAgent"

可以在Windows的【开始】–>【运行】中输入以下命令

chrome.exe --user-agent="User-Agent", "Mozilla/5.0 (Macintosh; Intel Mac OS X 10.12; rv:52.0) Gecko/20100101 Firefox/52.0"

或者Google Chrome快捷方式->右键"属性"->选项卡"快捷方式"->目标,在chrome.exe后追加-user-agent="UserAgent"

Safari 1.菜单栏“Preferences/首选项”->“Advanced/高级”,勾选“Show Develop menu in menu bar/在菜单栏中显示“开发”菜单”。
2.菜单栏会多出一项“Develop/开发”,通过里面的“User Agent/用户代理”Safari默认提供了些,可以点击其他输入自己的useragent。

程序代码强制设置

java

connection.setRequestProperty("User-Agent", "Mozilla/5.0 (Macintosh; Intel Mac OS X 10.12; rv:52.0) Gecko/20100101 Firefox/52.0");

iOS

NSString *userAgent =  @"Mozilla/5.0 (Macintosh; Intel Mac OS X 10.12; rv:52.0) Gecko/20100101 Firefox/52.0";
NSDictionary *dictionary =@{@"UserAgent":userAgent};
 [[NSUserDefaults standardUserDefaults] registerDefaults:dictionary];

PHP

<?php
	$UserAgent = 'Mozilla/5.0 (Macintosh; Intel Mac OS X 10.12; rv:52.0) Gecko/20100101 Firefox/52.0'
	$curl = curl_init();
	curl_setopt($curl, CURLOPT_URL, ‘http://xxx.com/xxx’);
	curl_setopt($curl, CURLOPT_USERAGENT, $UserAgent);
	$data = curl_exec($curl);
?>

Curl

curl --user-agent "Mozilla/5.0 (Macintosh; Intel Mac OS X 10.12; rv:52.0) Gecko/20100101 Firefox/52.0" --referer 'http://www.baidu.com/' -I http://www.xxx.com/

常用的UserAgent

Android

Name User Agent
Nexus 7 (Tablet) Mozilla/5.0 (Linux; Android 4.1.1; Nexus 7 Build/JRO03D) AppleWebKit/535.19 (KHTML, like Gecko) Chrome/18.0.1025.166  Safari/535.19
Samsung Galaxy S3 (Handset) Mozilla/5.0 (Linux; U; Android 4.0.4; en-gb; GT-I9300 Build/IMM76D) AppleWebKit/534.30 (KHTML, like Gecko) Version/4.0 Mobile Safari/534.30
Samsung Galaxy Tab (Tablet) Mozilla/5.0 (Linux; U; Android 2.2; en-gb; GT-P1000 Build/FROYO) AppleWebKit/533.1 (KHTML, like Gecko) Version/4.0 Mobile Safari/533.1

Firefox

Name User Agent
Firefox on Android Mobile Mozilla/5.0 (Android; Mobile; rv:14.0) Gecko/14.0 Firefox/14.0
Firefox on Android Tablet Mozilla/5.0 (Android; Tablet; rv:14.0) Gecko/14.0 Firefox/14.0
Firefox on Mac Mozilla/5.0 (Macintosh; Intel Mac OS X 10.8; rv:21.0) Gecko/20100101 Firefox/21.0
Firefox on Ubuntu Mozilla/5.0 (X11; Ubuntu; Linux x86_64; rv:21.0) Gecko/20130331 Firefox/21.0
Firefox on Windows Mozilla/5.0 (Windows NT 6.2; WOW64; rv:21.0) Gecko/20100101 Firefox/21.0

Google Chrome

Name User Agent
Chrome on Android Mobile Mozilla/5.0 (Linux; Android 4.0.4; Galaxy Nexus Build/IMM76B) AppleWebKit/535.19 (KHTML, like Gecko) Chrome/18.0.1025.133 Mobile Safari/535.19
Chrome on Android Tablet Mozilla/5.0 (Linux; Android 4.1.2; Nexus 7 Build/JZ054K) AppleWebKit/535.19 (KHTML, like Gecko) Chrome/18.0.1025.166 Safari/535.19
Chrome on Mac Mozilla/5.0 (Macintosh; Intel Mac OS X 10_7_2) AppleWebKit/537.36 (KHTML, like Gecko) Chrome/27.0.1453.93 Safari/537.36
Chrome on Ubuntu Mozilla/5.0 (X11; Linux x86_64) AppleWebKit/535.11 (KHTML, like Gecko) Ubuntu/11.10 Chromium/27.0.1453.93 Chrome/27.0.1453.93 Safari/537.36
Chrome on Windows Mozilla/5.0 (Windows NT 6.2; WOW64) AppleWebKit/537.36 (KHTML, like Gecko) Chrome/27.0.1453.94 Safari/537.36
Chrome on iPhone Mozilla/5.0 (iPhone; CPU iPhone OS 6_1_4 like Mac OS X) AppleWebKit/536.26 (KHTML, like Gecko) CriOS/27.0.1453.10 Mobile/10B350 Safari/8536.25

Internet Explorer

Name User Agent
Internet Explorer 6 Mozilla/4.0 (Windows; MSIE 6.0; Windows NT 5.2)
Internet Explorer 7 Mozilla/4.0 (compatible; MSIE 7.0; Windows NT 6.0)
Internet Explorer 8 Mozilla/4.0 (compatible; MSIE 8.0; Windows NT 6.0; Trident/4.0)
Internet Explorer 9 Mozilla/5.0 (compatible; MSIE 9.0; Windows NT 6.1; Trident/5.0)
Internet Explorer 10 Mozilla/5.0 (compatible; WOW64; MSIE 10.0; Windows NT 6.2)

Opera

Name User Agent
Opera on Mac Opera/9.80 (Macintosh; Intel Mac OS X 10.6.8; U; en) Presto/2.9.168 Version/11.52
Opera on Windows Opera/9.80 (Windows NT 6.1; WOW64; U; en) Presto/2.10.229 Version/11.62

Other

Name User Agent
BlackBerry - Playbook 2.1 Mozilla/5.0 (PlayBook; U; RIM Tablet OS 2.1.0; en-US) AppleWebKit/536.2+ (KHTML, like Gecko) Version/7.2.1.0 Safari/536.2+
MeeGo - Nokia N9 Mozilla/5.0 (MeeGo; NokiaN9) AppleWebKit/534.13 (KHTML, like Gecko) NokiaBrowser/8.5.0 Mobile Safari/534.13

Safari

Name User Agent
Safari on Mac Mozilla/5.0 (Macintosh; U; Intel Mac OS X 10_6_6; en-US) AppleWebKit/533.20.25 (KHTML, like Gecko) Version/5.0.4 Safari/533.20.27
Safari on Windows Mozilla/5.0 (Windows; U; Windows NT 6.1; en-US) AppleWebKit/533.20.25 (KHTML, like Gecko) Version/5.0.4 Safari/533.20.27
Safari on iPad Mozilla/5.0 (iPad; CPU OS 5_0 like Mac OS X) AppleWebKit/534.46 (KHTML, like Gecko) Version/5.1 Mobile/9A334 Safari/7534.48.3
Safari on iPhone Mozilla/5.0 (iPhone; CPU iPhone OS 5_0 like Mac OS X) AppleWebKit/534.46 (KHTML, like Gecko) Version/5.1 Mobile/9A334 Safari/7534.48.3

Spider / Bot

Name User Agent
BingBot (Bing's spider) Mozilla/5.0 (compatible; bingbot/2.0; +http://www.bing.com/bingbot.htm)
Googlebot (Google's spider) Googlebot/2.1 (+http://www.googlebot.com/bot.html)
Slurp! (Yahoo's spider) Mozilla/5.0 (compatible; Yahoo! Slurp; http://help.yahoo.com/help/us/ysearch/slurp)

Windows Phone

Name User Agent
Windows Phone 7 Mozilla/4.0 (compatible; MSIE 7.0; Windows Phone OS 7.0; Trident/3.1; IEMobile/7.0; LG; GW910)
Windows Phone 7.5 Mozilla/5.0 (compatible; MSIE 9.0; Windows Phone OS 7.5; Trident/5.0; IEMobile/9.0; SAMSUNG; SGH-i917)
Windows Phone 8 Mozilla/5.0 (compatible; MSIE 10.0; Windows Phone 8.0; Trident/6.0; IEMobile/10.0; ARM; Touch; NOKIA; Lumia 920)

iOS

Name User Agent
iPad Mozilla/5.0 (iPad; CPU OS 5_0 like Mac OS X) AppleWebKit/534.46 (KHTML, like Gecko) Version/5.1 Mobile/9A334 Safari/7534.48.3
iPhone Mozilla/5.0 (iPhone; CPU iPhone OS 5_0 like Mac OS X) AppleWebKit/534.46 (KHTML, like Gecko) Version/5.1 Mobile/9A334 Safari/7534.48.3
iPod Mozilla/5.0 (iPod; U; CPU like Mac OS X; en) AppleWebKit/420.1 (KHTML, like Gecko) Version/3.0 Mobile/3A101a Safari/419.3

转载请注明:天狐博客 » UserAgent用户标识详解与应用

移动端开发使用viewport自适应h5页面

$
0
0

在移动端进行网页开发,首先要弄明白viewport在移动设备中的作用,meta中viewport的作用是让我们的网页更好的适配和响应各种分辨率不同的移动设备。

常用代码

<meta name="viewport" content="width=device-width, initial-scale=1.0, maximum-scale=1.0, user-scalable=0">

语法

<!-- html document -->
<meta name="viewport"
content="
height = [pixel_value | device-height] ,
width = [pixel_value | device-width ] ,
initial-scale = float_value ,
minimum-scale = float_value ,
maximum-scale = float_value ,
user-scalable = [yes | no] ,
target-densitydpi = [dpi_value | device-dpi | high-dpi | medium-dpi | low-dpi]
"
/>

content中属性的作用:

属性 作用
width 设置layout viewport  的宽度,为一个正整数,或字符串"width-device"
height 设置layout viewport 的高度,这个属性对我们并不重要,很少使用
initial-scale 初始缩放。即页面初始缩放程度。这是一个浮点值,是页面大小的一个乘数。例如,如果你设置初始缩放为“1.0”,那么,web页面在展现的时候就会以target density分辨率的1:1来展现。如果你设置为“2.0”,那么这个页面就会放大为2倍。
minimum-scale 允许用户的最小缩放值,为一个数字,可以带小数
maximum-scale 最大缩放。即允许的最大缩放程度。这也是一个浮点值,用以指出页面大小与屏幕大小相比的最大乘数。例如,如果你将这个值设置为“2.0”,那么这个页面与target size相比,最多能放大2倍。
user-scalable 用户调整缩放。即用户是否能改变页面缩放程度。如果设置为yes则是允许用户对其进行改变,反之为no。默认值是yes。如果你将其设置为no,那么minimum-scale 和 maximum-scale都将被忽略,因

​为根本不可能缩放。

 target-densitydpi  一个屏幕像素密度是由屏幕分辨率决定的,通常定义为每英寸点的数量(dpi)。Android支持三种屏幕像素密度:低像素密度,中像素密度,高像素密 度。一个低像素密度的屏幕每英寸上的像素点更少,而一个高像素密度的屏幕每英寸上的像素点更多。Android Browser和WebView默认屏幕为中像素密度。

target-densitydpi

下面是 target-densitydpi 属性的 取值范围
device-dpi –使用设备原本的 dpi 作为目标 dp。 不会发生默认缩放。
high-dpi – 使用hdpi 作为目标 dpi。 中等像素密度和低像素密度设备相应缩小。
medium-dpi – 使用mdpi作为目标 dpi。 高像素密度设备相应放大, 像素密度设备相应缩小。 这是默认的target density.
low-dpi -使用mdpi作为目标 dpi。中等像素密度和高像素密度设备相应放大。
<value> – 指定一个具体的dpi 值作为target dpi. 这个值的范围必须在70–400之间。

<!-- html document -->
<meta name="viewport" content="target-densitydpi=device-dpi" />
<meta name="viewport" content="target-densitydpi=high-dpi" />
<meta name="viewport" content="target-densitydpi=medium-dpi" />
<meta name="viewport" content="target-densitydpi=low-dpi" />
<meta name="viewport" content="target-densitydpi=200" />

为了防止Android Browser和WebView 根据不同屏幕的像素密度对你的页面进行缩放,你可以将viewport的target-densitydpi 设置为 device-dpi。当你这么做了,页面将不会缩放。相反,页面会根据当前屏幕的像素密度进行展示。在这种情形下,你还需要将viewport的 width定义为与设备的width匹配,这样你的页面就可以和屏幕相适应。

在iOS中动态设置meta

- (void)webViewDidFinishLoad:(UIWebView *)webView
{
   NSString *meta = [NSString stringWithFormat:@"document.getElementsByName(\"viewport\")[0].content = \"width=%f, initial-scale=1.0, minimum-scale=1.0, maximum-scale=1.0, user-scalable=no\"",self.view.frame.width];
   [webView stringByEvaluatingJavaScriptFromString:meta];
}

所以上述代码的作用就是让当前viewport的宽度等于设备的宽度,同时不允许用户手动缩放。也许允不允许用户缩放不同的网站有不同的要求,但让viewport的宽度等于设备的宽度,这个应该是大家都想要的效果,如果你不这样的设定的话,那就会使用那个比屏幕宽的默认viewport,也就是说会出现横向滚动条。

转载请注明:天狐博客 » 移动端开发使用viewport自适应h5页面

macOS安装MySQL教程

$
0
0

不借助任何第三方安装工具,手动进行MySQL的下载到卸载。

下载

访问MySQL的官网http://www.mysql.com/downloads/ 然后在页面中会看到社区版“MySQL Community Server”点击。

进入MySQL具体的下载界面(http://www.mysql.com/downloads/mysql/),网页会自动选好你系统平台,下面有两种安装包,个人喜好DMG。点击download下载即可。

不注册账号,只下载。

安装

点击下载下来的mysql-5.7.17-macos10.12-x86_64.dmg文件。点击装载后的 mysql-5.7.17-macos10.12-x86_64.pkg 继续安装。一路下一步。

安装完成后,会弹出提示框,告诉你mysql root被设置了一个默认的密码。

启动

在系统偏好设置中,多出了mysql的图标。

进入后点击 “Start MySQL Server”启动MySQL服务。

终端配置

默认终端是不识别mysql与mysqladmin命令的。执行mysql命令时,先执行以下命令即可。

alias mysql=/usr/local/mysql/bin/mysql
alias mysqladmin=/usr/local/mysql/bin/mysqladmin

alias方法关闭了终端再开就无效了

命令长期有效果方法一

终端,输入:
(当前用户的根目录下的.bash_profile)

$ sudo vim ~/.bash_profile

然后在里面输入:

export PATH=$PATH:/usr/local/mysql/bin

ESC推出编辑模式,然后输入:

:wq 回车保存推出。

source ~/.bash_profile(重新加载配置生效)

命令长期有效果方法二

建立一个软链接到bin目录(终端默认目录)

$ cd /usr/local/bin/

$ sudo ln -fs /usr/local/mysql/bin/mysql mysql

修改密码

已知mysql密码

5.7的版本不会再给root用户分配默认密码,而是会给一个随机密码,安装mysql成功后会弹出一个随机密码让你保存,很遗憾我没截图。如果你没有保存,,在右侧的通知栏里会有

$ mysqladmin -u root -p password newpass

忘记了mysql密码

1.关闭mysql服务

$ sudo /usr/local/mysql/support-files/mysql.server stop

2.开启安全模式启动mysql

$ sudo /usr/local/mysql/bin/mysqld_safe --skip-grant-tables  //如果未执行完,可以新建终端窗口执行下面的命令。

$ mysql //进入mysql命令模式

mysql> use mysql //进入mysql数据库

mysql> flush privileges; //刷新MySQL的系统权限相关表

mysql> set password for 'root'@'localhost'=password('新密码')

mysql> quit //推出

使用

登录MySQL

$ mysql -u root -p

回车后,输入密码,回车。

查看版本

$ mysql --version

启动停止重启

//启动mysql
$ sudo /usr/local/MySQL/support-files/mysql.server start
//停止mysql
$ sudo /usr/local/mysql/support-files/mysql.server stop
//重启mysql
$ sudo /usr/local/mysql/support-files/mysql.server restart

卸载

使用UninstallPKG软件搜索mysql关键字,卸载即可。

开启MySQL之旅吧!


转载请注明:天狐博客 » macOS安装MySQL教程

macOS下安装配置PhpStorm

$
0
0

因为个人倾向于系统有的东西,就不使用其他工具一键安装。所以,本文使用macOS自带的Apache与PHP配置PhpStorm开发环境。

下载

https://www.jetbrains.com/phpstorm/download/ 得到dmg安装包 PhpStorm-2017.1.1.dmg

安装

双击PhpStorm-2017.1.1.dmg,将PhpStorm做到Application中。

在Application中运行PhpStorm一路下一步。最后使用license server 方式激活,license server 地址:http://idea.iteblog.com/key.php

配置环境

默认mac中都是自带php,apache,PHP在目录/usr/bin/php中。

配置Apache

sudo apachectl start     //开启Apache
sudo apachectl restart   //重启Apache
sudo apachectl stop   //停止Apache

apache默认站点根目录为:

/Library/WebServer/Documents

配置文件在

/etc/apache2/httpd.conf

加载php

文本编辑器或者vim打开httpd.conf

sudo open -e /etc/apache2/httpd.conf

搜索LoadModule php5_module libexec/apache2/libphp5.so,将前面#号去掉。

配置MySQL

不借助任何第三方安装工具,手动进行MySQL的下载到卸载教程。macOS安装MySQL教程

配置PHP

cd /private/etc/
#默认没有php.ini,需要拷贝一下
sudo cp php.ini.default php.ini

vi或者编辑器前往后编辑php.ini

sudo open -e /private/etc/php.ini

底部增加Xdebug配置,用来使PhpStorm有断点调试等功能。

[Xdebug]
zend_extension="/usr/lib/php/extensions/no-debug-non-zts-20131226/xdebug.so"
xdebug.remote_enable = on
;xdebug.remote_handler=dbgp
xdebug.remote_host="127.0.0.1"
xdebug.remote_port=9000
xdebug.profiler_enable = 1
xdebug.profiler_enable_trigger = off
xdebug.profiler_output_name = cachegrind.out.%t.%p
xdebug.remote_autostart = on

保存后重启apache

sudo apachectl restart

xcdebug.so默认是在/usr/lib/php/extensions/目录下,但是no-debug-non-zts-20131226版本不尽相同,需要设置成自己系统里的。

使用Phpstorm

create project =>PHP Empty Project =>location 浏览或者填写目录为apache网站目录的子目录,/Library/WebServer/Documents/HelloPHP

右键建好的公工程左侧导航条项目名上,new file,index.php 输入段测试代码

<?php echo 'hello php' ?>

点击右上角出现的浏览器图标,预览下吧。

会发现,网站运行在localhost的63342端口,并且报了Phpstorm 502 Bad Gateway错误。

原因是没有配置PHP解析器。

解决方法两种,一种是配置一个解析器

第二种使用macOS自带PHP与Apache网站目录并且使用80端口。

在Phpstorm的Preference->Build, Execution, Deployment->Deployment->点+新建, name自定义,我起名叫webroot。 type选择Local or mounted folder。

Mappings中,我们看到local path为我们新建的php目录地址,web path on server 'webroot' (relative to folder).

因为apache容器的根目录为/Library/WebServer/Documents/,所以在其中填入相对于/Library/WebServer/Documents/的目录名称,即HelloPHP保存。

点击浏览器预览。

enjoy it!


转载请注明:天狐博客 » macOS下安装配置PhpStorm

iOS开发之"动态"更换App备用图标

$
0
0

iOS10.3苹果新增了一个API,字面意思也很好理解,设置可选的,备用的图标。

[[UIApplication sharedApplication] setAlternateIconName:iconName completionHandler:^(NSError * error) {
     if (error) {
         NSLog(@"set icon error: %@",error);
     }
     NSLog(@"The alternate icon's name is %@",iconName);
}];

之所以“动态”加了引号,是因为并不是我们了解那样动态,并不可以通过网络接口动态设置图标,而是要预设置一些可选备用图标。相对“动态”的来更换图标。

了解如何使用可选图标前,先了解下info.plist中的CFBundleIcons。

CFBundleIcons

CFBundleIcons (字典 - iOS, tvOS)包含关于这个app使用的icon的所有信息 ,这个key允许你基于他们的预期使用分组icon,指定多个icon文件与特定键修改图标的外观,这个字典可以包含如下key:

  • CFBundlePrimaryIcon—这个key标识主屏幕的主图标,设置应用等等其他地方。
  • CFBundleAlternateIcons—这个key标识主屏幕可选图标,设置应用等等其他地方。T
  • UINewsstandIcon—这个key标识应用程序Newsstand(报刊杂志)的默认图标

CFBundleIcons key支持iOS5以后的系统和tvOS9.0以后的系统,你可以把CFBundleIconFiles和CFBundleIconFile组合在一起,但在iOS 5.0及以后的系统,CFBundleIconFiles优先。

CFBundlePrimaryIcon 字典的内容

CFBundlePrimaryIcon的值在iOS和tvOS中是不同的:

  • 在tvOS中,CFBundlePrimaryIcon的值是字符串,值是app的icon文件名
  • 在iOS中,CFBundlePrimaryIcon的值是字典. Table 4 列出了字典包含的所有的keys和values
Table 4  CFBundlePrimaryIcon 字典的keys
Key Value Description
CFBundleIconFiles 字符串数组 必须。每一个数组中的字符串都是icon文件的文件名,你可以包含多个不同尺寸的icon,用来支撑iPhone,iPad或者通用app

列表的图标,包括它们的大小,可以包括在应用bundle中,

参考在 在 App Programming Guide for iOS Advanced App Tricks app icons章节, 更多如何创建icon的信息, 参考 iOS Human Interface Guidelines.

UIPrerenderedIcon 布尔值 这个key指定图标文件是否已经包含发光的效果,如果你对icon已经有了发光效果,设置此值为YES阻止系统再一次增加同一个效果,如果不包含这个key,或者设置值为NS,系统应用发光效果给在CFBundleIconFiles字典中列出的图标文件

当指定图片文件名,最好省略文件名后缀,省略文件名扩展可以让系统使用标准分辨率的图像文件名自动检测高分辨率(@2x)版本的图像文件。如果包含文件扩展名,您必须明确的(包括高分辨率的)指定所有图像文件,系统在bundle中的资源目录中查找icons文件。

CFBundleAlternateIcons 字典的内容

CFBundleAlternateIcons的值在iOS和tvOS中是不同的:

  • 在tvOS中,CFBundleAlternateIcons 是一个字符串数组,每一个字符串的值是你app icon文件名
  • 在iOS中,CFBundleAlternateIcons 是一个字典。 每一个字典的key是可选图标的名称,也是传给UIApplication的setAlternateIconName:completionHandler:  方法的字符串,每一个图标名key对应值同样也是一个字典,包含的key在Table 5中:
Table 5 CFBundleAlternateIcons 字典在iOS中的keys
Key Value Description
CFBundleIconFiles Array of strings 必须。每一个数组中的字符串都是icon文件的文件名,你可以包含多个不同尺寸的icon,用来支撑iPhone,iPad或者通用app

列表的图标,包括它们的大小,可以包括在应用bundle中,参考 iOS Human Interface Guidelines.

UIPrerenderedIcon Boolean 这个key指定图标文件是否已经包含发光的效果,如果你对icon已经有了发光效果,设置此值为YES阻止系统再一次增加同一个效果,如果不包含这个key,或者设置值为NS,系统应用发光效果给在CFBundleIconFiles字典中列出的图标文件

当指定图片文件名,最好省略文件名后缀,省略文件名扩展可以让系统自动检测高分辨率(@2x)版本的图像文件使用标准分辨率的图像文件名。如果包含文件扩展名,您必须明确的(包括高分辨率的)指定所有图像文件,系统在bundle中的资源目录中查找icons文件。

重要:如果你的app包含IPad特有版本的图标,必须包含CFBundleIcons~ipad在info.plist中。CFBundleIcons~ipad与CFBundleIcons目录结构一致。

UINewsstandIcon 字典的内容

UINewsstandIcon的值是一个字典来标识在报刊app中显示的默认的图片和风格选项,Table 6描述了所有的可用keys

Table 6  UINewsstand Icon 字典的key
Key Value Description
CFBundleIconFiles 字符串数组 必须,每一个数组中的字符串包含icon文件的名称,你可以使用这个key指定一个标准icon的结合,用于你的app在Newsstand中展示,这个icon在没有封面的时候用于下载的问题。 This icon is used when no cover art is available for a downloaded issue.

列表的图标,包括它们的大小,可以包括在应用bundle中,参考 App Programming Guide for iOS. 中 App-Related Resources app icons章节, 更多如何创建icon的信息, 参考 iOS Human Interface Guidelines.

UINewsstandBindingType 字符串 这个key提供如何风格化Newsstand art的信息,值为一下字符串中的任一个:
  • UINewsstandBindingTypeMagazine
  • UINewsstandBindingTypeNewspaper
UINewsstandBindingEdge 字符串 这个key提供如何风格化Newsstand art的信息,值为一下字符串中的任一个:
  • UINewsstandBindingEdgeLeft
  • UINewsstandBindingEdgeRight
  • UINewsstandBindingEdgeBottom

设置可选的图标

声明

- (void)setAlternateIconName:(NSString *)alternateIconName
completionHandler:(void (^)(NSError *error))completionHandler;

参数

alternate​Icon​Name

可选图标的名称,在app的Info.plist文件中声明的CFBundle​Alternate​Icons中设置。如果要显示应用程序的主图标alternateIconName 传nil即可,主图标使用CFBundle​Primary​Icon声明,CFBundle​Alternate​Icons与CFBundle​Primary​Icon两个key都是CFBundle​Icons的子条目。completion​Handler

当有结果的时候的回调,当视图改变app图标的时候,系统会通过调用completion​Handler来报告修改结果。(completion​Handler在UIKit-provided queue中执行, 不需要再app主队列执行。completion​Handler只有一个error返回值:

成功改变图标的的时候,error为nil,如果发生错误,error描述发生什么了。并且alternate​Icon​Name的值保持不变。

讨论

使用这个方法改变app的图标。主图标或者可选图标,如果supports​Alternate​Icons属性返回YES,你可以执行改变操作。必须在app的info.plist文件中的CFBundle​Icons中提前声明可选图标与主图标。

使用

由于supportsAlternateIcons与setAlternateIconName都是新的api,考虑到不同版本的系统要进行判断。

- (void)changeIcon:(NSString*)iconName{
    UIApplication *application = [UIApplication sharedApplication];
    //判断系统是否支持
    if(![UIApplication instancesRespondToSelector:@selector(supportsAlternateIcons)])
    {
        NSLog(@"not support AlternateIcons");
    }else
    {
        if ([application supportsAlternateIcons])
        {
            [application setAlternateIconName:iconName completionHandler:^(NSError * error)
            {
                if (error) {
                    NSLog(@"set icon error: %@",error);
                }
                NSLog(@"The alternate icon's name is %@",iconName);
            }];
        }else
        {
            NSLog(@"not support AlternateIcons");
        }
    }
}

编辑配置info.plist

info.plist涉及到很多内容编辑,最好使用源码方式,右键info.plist,open as source code

<key>CFBundleIcons</key>  
<dict>  
    <key>CFBundleAlternateIcons</key>  
    <dict>  
        <key>AlternateIconFileName</key>  
        <dict>  
            <key>CFBundleIconFiles</key>  
            <array>  
                <string>AlternateIconFileName</string>  
            </array>  
            <key>UIPrerenderedIcon</key>  
            <false/>  
        </dict>  
    </dict>  
    <key>CFBundlePrimaryIcon</key>  
    <dict>  
        <key>CFBundleIconFiles</key>  
        <array>  
            <string>PrimaryIconFileName</string>  
        </array>  
    </dict>  
</dict>

相关链接

https://developer.apple.com/reference/uikit/uiapplication/2806818-setalternateiconname#parameters

Information Property List Key Reference

iOS Human Interface Guidelines

转载请注明:天狐博客 » iOS开发之"动态"更换App备用图标

Viewing all 115 articles
Browse latest View live